.png.3b3332cc2256ad0edbc2fe9404feeef0.png)


doglover
-
Posts
310 -
Joined
-
Last visited
Content Type
Profiles
Forums
Downloads
Posts posted by doglover
-
-
My pick would be extruded AL for custom fit seamless gutter. But, I've never seen in Thailand. Oh well.
Look no further, your import products are here!
Certainly ideal. Did you get a quote per metre installed?
-
But recently I spotted a house that I believe has used galvanized steel and had it painted. It looks really good and I may do the same. Not sure how long the paint would stay put though. Any thoughts?
I don't know how much the paint would extend to the duration of your galvanised gutters, but I would guess you need to paint both the inside and the outside to make a difference.
That's what we did, correct primer and 'industrial' lacquer inside and out. It remains to see how long they actually last.
http://www.thaivisa.com/forum/topic/481794-housebuilding-thread/?p=6385501
That's what I'm talking about. Man that's looks sharp! Especially with your roof style.
I'm not a painter. Was it brushed or sprayed?
-
A recently had galvanized gutters installed on an outbuilding and they used "village brazing system" kamalabob2 describes. I did not realize that this method will not last long, or perhaps it works better with galvanized steel than stainless?
Thought about also installing galvanized on the main house but I think it cheapens the appearance of a nice house. So I thought I would install Windsor PVC (after we get around to properly fitting some more smartwood eave so the birds cannot enter).
But recently I spotted a house that I believe has used galvanized steel and had it painted. It looks really good and I may do the same. Not sure how long the paint would stay put though. Any thoughts?
-
If it just has a 2-pin plug and separate ground wire there are plenty of grounded double adapters about, plug the appliance into one side, connect the ground wire of the appliance to the ground pin of a 3-pin plug and plug into the other side of the adapter.
QED

Yes I realized that. I was just looking for something a little cleaner. But have not found the gizmo I described.
Surprisingly, I also have not yet found a grounded adapter. All I have found is a bulky yellow and black weather resistant 3 prong cord end which I have exclusively for the ground wire.
-
Be sure they are using a quality stainless steel wire not just farm wire.
-
My wife wants to open a clothing store selling adult and children's clothing. She wants to specialize in Korean brand names. We have found some small stores that are ordering clothing from the internet and I can't help thinking that there must be a cheaper alternative.
If she was to order only 5 of each chosen item is it possible to buy direct from a manufacturer in Korea?
-
It was mentioned that one may not want to change the cord of the appliance for a 3 conductor until the warranty is finished.
Is there some sort of 3 prong gizmo that the provided ground wire with the appliance could be terminated onto the ground prong of the gizmo?
Then the gizmo is plugged into the 3 prong receptacle. And finally the two prong cord of the appliance plugged into the gizmo?
I recently looked for such a gizmo in Home Pro and Global House and did not see anything.
-
^^^^
Nice pond!
That filter must be working very well to keep the water crystal clear with all those koi.
Did you build the filter yourself?
Pictures and costs would be appreciated.
-
I use both types of liners. The plastic actually works ok as long as it is doubled up and the surface it lays on is smooth. For our plastic lined pond it was assembled on a semi-smooth concrete pad (cleaned thoroughly) and the pond walls built from those stackable lego type red bricks. Do not put any sculptures or sizeable rocks in a thin plastic lined feature of course. To clean I just unstack some of the bricks and then the plastic liner drops down and the water flows out. Restack and pleat the liner when finished.
For the concrete lined pond we had the worker add a water sealant to the rendering mix. When he finished, the floor and walls of the pond were very smooth. It has been holding water without leaks for a year now. Not sure what brand he used but I would think it would be easy to describe what one wants to the worker or a hardware store. Had him install a pvc drain pipe in the low end of the pond with a threaded cap for cleaning.
For both ponds I use an out of pond DIY pond filter that pumps water from the opposite end of the pond from the filter into the filter. After flowing through the filter the water drops about a foot into the pond which helps with aeration.
The pictures are of the concrete lined pond. I have no plants in the plastic lined pond as I don't want to cut the plastic.
-
 1
1
-
-
I am curious why the gate openers have had to be replaced and how long they lasted? I would hope they would last some time as they are fairly expensive. Something one would want to get right the first time around.
I recently saw two models at Global. The model (with plastic case) for a sliding gate was 9,xxx baht. The other models was for two piece gate that swings inward and I think it was around 18,xxx baht.
(The model in the you tube vid has cost me millions of baht!)
-
^^^
Turns out it's more of a 'glow in the dark' thingy. If you turn off the lights at night you will notice a faint glow. Another annoyance is that the on\off is reversed from normal switching. In my carport at home I just installed them upside down. But in the rental we are in during the week they have installed them as per manufacturer. So I never quit know on from off!
-
bankruatsteve. When I wired my carport with attached guestroom and washroom I did what I believe you are wanting to do. I only ran 3 conductor lumex to receptacles that I knew would need a ground for planned appliances and these receptacles were three prong compatible.
Other areas I knew would only ever have two prong appliances plugged in (and with no metal casing) I ran a 2 conductor lumex and installed a 2 prong compatible receptacle. Of course it's my house and I understand what appliances grounding requirements are.
Now if I was helping a neighbour or a friend that means that they don't understand what is required. So to ensure their safety, and cover my own arse from any possible liability, I would advise them to run a 3 wire cable (or pull 3 single conductors for conduit) to every receptacle.
And if they decide to neglect your advice to connect an appliances coiled up ground wire to a ground terminal then at least you're off the hook.
-
Well that was short lived. <deleted> borrowed a neutral for the gate lights! And here I thought with a 100+ housing project from a semi-respectable name would make my 450 baht a sure bet! Live and learn.
At least I can try the receptacle circuit upstairs for free.....
-
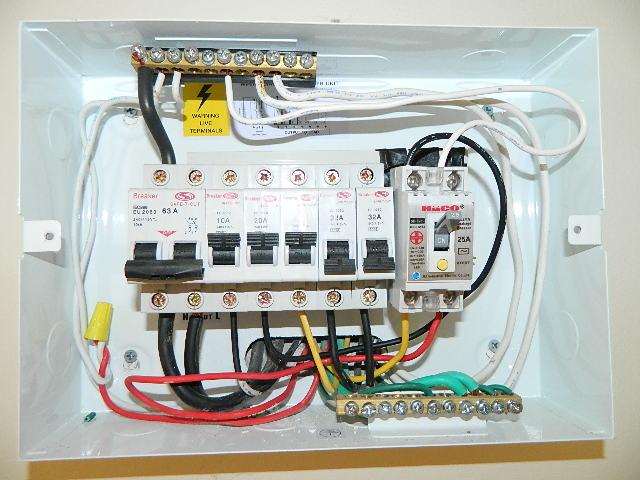
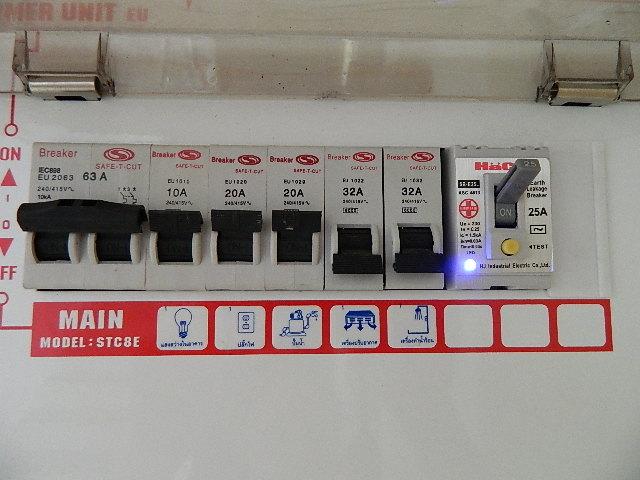
With the recommendation of 30mA being sufficient RCD protection I have come up with the following as the cheapest option I could find. Purchased and installed a 25A (didn't have a 20A) Haco ELB in series with the receptacle circuit MCB. Time will tell if the circuits neutral has been borrowed but so far so good.
This is a temporary solution and rather mickey mouse but I have an agreement with the landlord of not drilling any holes in the walls. I also did not want to spend the baht required for a stand alone RCBO for the mains as I can't see needing it after our lease is up. And yes the wiring is ugly as it's temporary.
The size of the Haco ELB worked out well vertically as it is just slightly bigger than the hole in the CU cover so I could jam it in and have it hold itself in place. Horizontally it was narrower than two MCB slots so there is a small gap there unfortunately. Also the switch of the Haco is longer than the stock MCB's so the transparent cover does not completely close
. But for 450 baht it works for me.
-
^^^
I had just realized that and logged back on but too late. My logic center was working in the Canadian region where radials are not used.
-
Came back empty handed from my trip to Global House. The only individual RCBO's they have are Schneider brand and incompatible with this CU. (good point about the borrowed neutrals)
I found it surprising that I could buy an entire 8 way safe-t-cut brand CU with RCBO main breaker for the same price as a stand alone RCBO 30mA breaker. There is not enough room to fit the safe-t-cut brand RCBO main inside the existing CU's.
I think I'll look for a GFCI receptacle and swap it out with the first receptacle in the circuit.
-
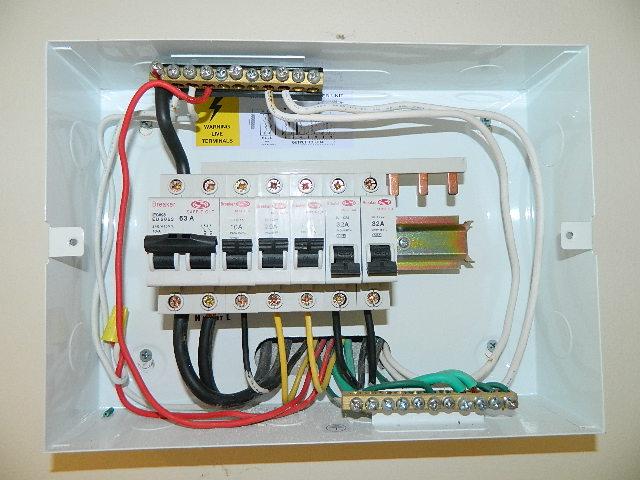
We are renting a house in a gated community in Khon Kaen which we stay at during the week so our kids can attend a decent school. The project is no more than five years old and there is a Safe-T-Cut brand CU upstairs and downstairs. I was surprised to find that there is no adjustable main RCBO installed in either CU. The mains must be spliced in the attic as each panel has only two mains wires.
Is it not required by Thai electrical code to have a RCD? Or is that only for TT installations?
Also there is no MEN link in the CU's. Is that not also typical for "big city" distribution networks?
Fortunately the receptacles are on dedicated circuits and there are spare slots in the CU's. So I can just swap out the receptacle circuit MCB's for RCBO's.
Downstairs there will be appliances on the circuit so I was thinking of installing a 10mA RCBO, yet this is also the area most likely to have one of our children stick something in a receptacle. Upstairs I would be installing a 5mA as there are no appliances.
Now it's time for constructive criticism.
-
So, with that single core, just be sure to cut the identified conductor 10% shorter than the live conductor. Will save you 2% on your electrical bill as the electrons will return home faster.
-
I'll second the Mai Shera recommendation. Probably cheaper than real hardwood and zero risk of termite attraction. In our house we installed the plastic look like wood baseboards. The problem is it is hollow and this makes a great house for ants and other bugs (even found gecko eggs in there) along the rough little crevice where floor and wall meet.
If I were to do it again...
- Fit the "conwood" for installation
- Sprinkle bug killing powder in the rough crack where the walls and floor meets
- Install the "conwood"
- Fill any small gaps with paintable silicone.
Make sure to do steps 2 and 4 yourself.
-
jbrain - Yeah I figured it would be sliding doors in general with a the gap at the bottom.
Khun Jean - Both sections of the sliding doors I purchased slide. Not that I asked for that, it is just how the came. And I did not opt for insect screens.
Mike45 - Good revision Mike. Especially if your new build is in the country, a lot more bugs.
I would also highly recommend upgrading the locking mechanisms to the higher spec. It is expensive to upgrade but the standard locking mechanisms are crap. The upgraded locks are multi-point and must be fitted during door/window construction. You'll thank yourself later when you've forgotten about the money.
-
Windsor sliding doors (and perhaps sliding doors in general) have too much play where the bottom of the doors ride on the tracks. When all the bugs come out to play the night after a heavy rain the smaller ones can make their way into the house. I have to stuff towels in the open side of the track tight against the door to keep hundreds of bugs out. Also of course, cooling losses and noise pollution. If I ever build a new house I will use French doors rather than sliders.
-
Electrolyte drinks grow on trees in Thailand!
Coconuts!...... At least that's what I use, and tasty as well.
Water for the ride and the meat for a shake!
-
Windsor Roi Et office....
NOT!
The product itself I am happy with..... except for the sliding doors.
-
A fan that is too dirty can also cause the fan to give off a varying speed sound every few seconds like a rising and falling pitch instead of a steady sound level (not to be confused with the normal changing of fan speed if set to Auto speed....but these Auto speed changes don't occur every few seconds like you seem to hear from a dirty squirrel cage fan).
Great info Pib! Just thought I would mention that the fan sound pitch changes could also be caused by voltage fluctuation. Maybe not an issue for big city residents, but for us folks in the sticks it's a common occurrence.


Bathroom Hot Water Heater Problem ... any clues?
in DIY Forum
Posted
Being that you live in Jom Tien you must have many a farang capable of this job within walking (or scooter) distance of your condo.
Put out an open invite to any neighbour TV'ers to PM you. I would like to think someone would stop by to help you out for this easy job with the offer of a decent caliber beer or three.