ThaiFig
-
Posts
21 -
Joined
-
Last visited
ThaiFig's Achievements
")


-
My DIY Solar Doghouse Project
ThaiFig replied to ThaiFig's topic in Alternative/Renewable Energy Forum
That's too sensible a response 🙂 I would agree that it shouldn't make any difference to the integrity of the panel. But the legal departments of these big corporations are not known for their generous nature or technical expertise. In short, I wouldn't trust them not to use it as an excuse in a warrantee claim situation. I'd definitely print out that email were I you! -
The fuel tariff which is added to each power bill by PEA will be adjusted again in May. The current proposals are to keep it at the present level of .39 baht per unit, raise it to .55 baht per unit, or raise it to 1.65 baht per unit. Strangely enough, there are no proposals to remove it entirely.... The Energy Regulatory Commission (ERC) vis the agency responsible.
-
Sorry to hear about your injuries, fortunate you didn't hit your head as well. My roof is not as high, but a fall would still be damaging to my 70 year old bones, so I will be doubly cautious.
-
My DIY Solar Doghouse Project
ThaiFig replied to ThaiFig's topic in Alternative/Renewable Energy Forum
I like the idea of a middle support, but in my case the purlins are too far apart and too few in number. The hanger bolts I got are less than 70 baht each, and very solid, so 4 of them should hold down a panel even in the wind (I hope). I'll use the standard aluminum clamps that are usually attached to aluminum rails, but I'll mount them in the middle of 10cm long galvanized box tubing which in turn will be bolted to the angled aluminum that comes with each hanger bolt. Kind of a Rube Goldberg approach I know. Drilling mounting holes in the sides of the solar panel isn't an option for me, as that would void the warranty. With Tier 1 panels, I figure there is at least a 50-50 chance the company will be around to honor their warranty if I need them. I do like your custom bracket approach, however, If I hadn't already stocked up on these hanger bolts before finding the forum, I proably would have done something similar. -
Yeah acouple years ago I saw a worker at my wife's store go through our roof while putting up a sign over her store , but thankfully the doghouse tiles are new and can support my weight ( I tested by suspending one on some spares setting on cement blocks on the ground and walking on them) . But after seeing your inadvertant air conditioning vent, I will probably add a second layer of cement tiles loosely on top of the first while sitting on the roof ( I have many extras). Were your tiles new? Do you know the thickness you used?
-
My DIY Solar Doghouse Project
ThaiFig replied to ThaiFig's topic in Alternative/Renewable Energy Forum
Yeah, I couldn't find any metal screw thread versions, but I tested them with double steel layer penetration and they held fine. My Dobies love water, they complain loudly if I'm hosing off the platform and don't let them attack the spray stream. I must stop and spray them down or they won't stop barking. My GSD, on the other hand, hates getting even a little bit wet... -
My DIY Solar Doghouse Project
ThaiFig replied to ThaiFig's topic in Alternative/Renewable Energy Forum
I am preparing to mount the first four solar panels on the roof so I did some measuring and calculations in preparation for drilling the holes in the roof. It turns out these cement roof tiles have an alternating peak and valley form which repeats every 23 cm. My solar panels are 113.4 cm wide, and the center clamps add 2cm to that, giving me a spacing of 115.4 cm/ panel. 5 * 23 cm yields 115 cm, a nearly perfect match. The roof channels are 10 cm wide, so I can easily move the support holes right or left a cm or two as needed to remain centered in the gap between panels over the course of nine supports for 8 panels. I need to mount the supports in the valleys because the screws don't hold securely enough when only penetrating the top steel layer, and they're not long enough to go through both steel layers of the underlying square tube purlins if they are raised up by the curve of the cement tile peaks. Additionally, the flat valley floor allows me the small adjustments I need left and right to match the panel spacing. I know this might introduce leaks in the roof but I'll apply silicone around the rubber seals of each screw to hopefully avoid that. The dogs won't complain if their roof leaks a bit but I may use this method again on my own home roof in the future if it proves satisfactory. The second lucky coincidence is that mounting 8 panels means I need the width of 40 valleys plus one more for the end clamp of the last panel. I counted the number of channels in my doghouse roof, and I have exactly 41. Sometimes fate just smiles on you... I will clamp 12 cm long pieces of 2-inch square steel to each vertical hanger bolt to make the support surfaces for each panel. I have the galvanized steel left over from a previous construction project, but only one 6 meter piece. But that's plenty for this railess system. Yes, rails would have been easier, if I'd had enough steel laying around. The photo is a picture of the double ended hanger bolts I'm using.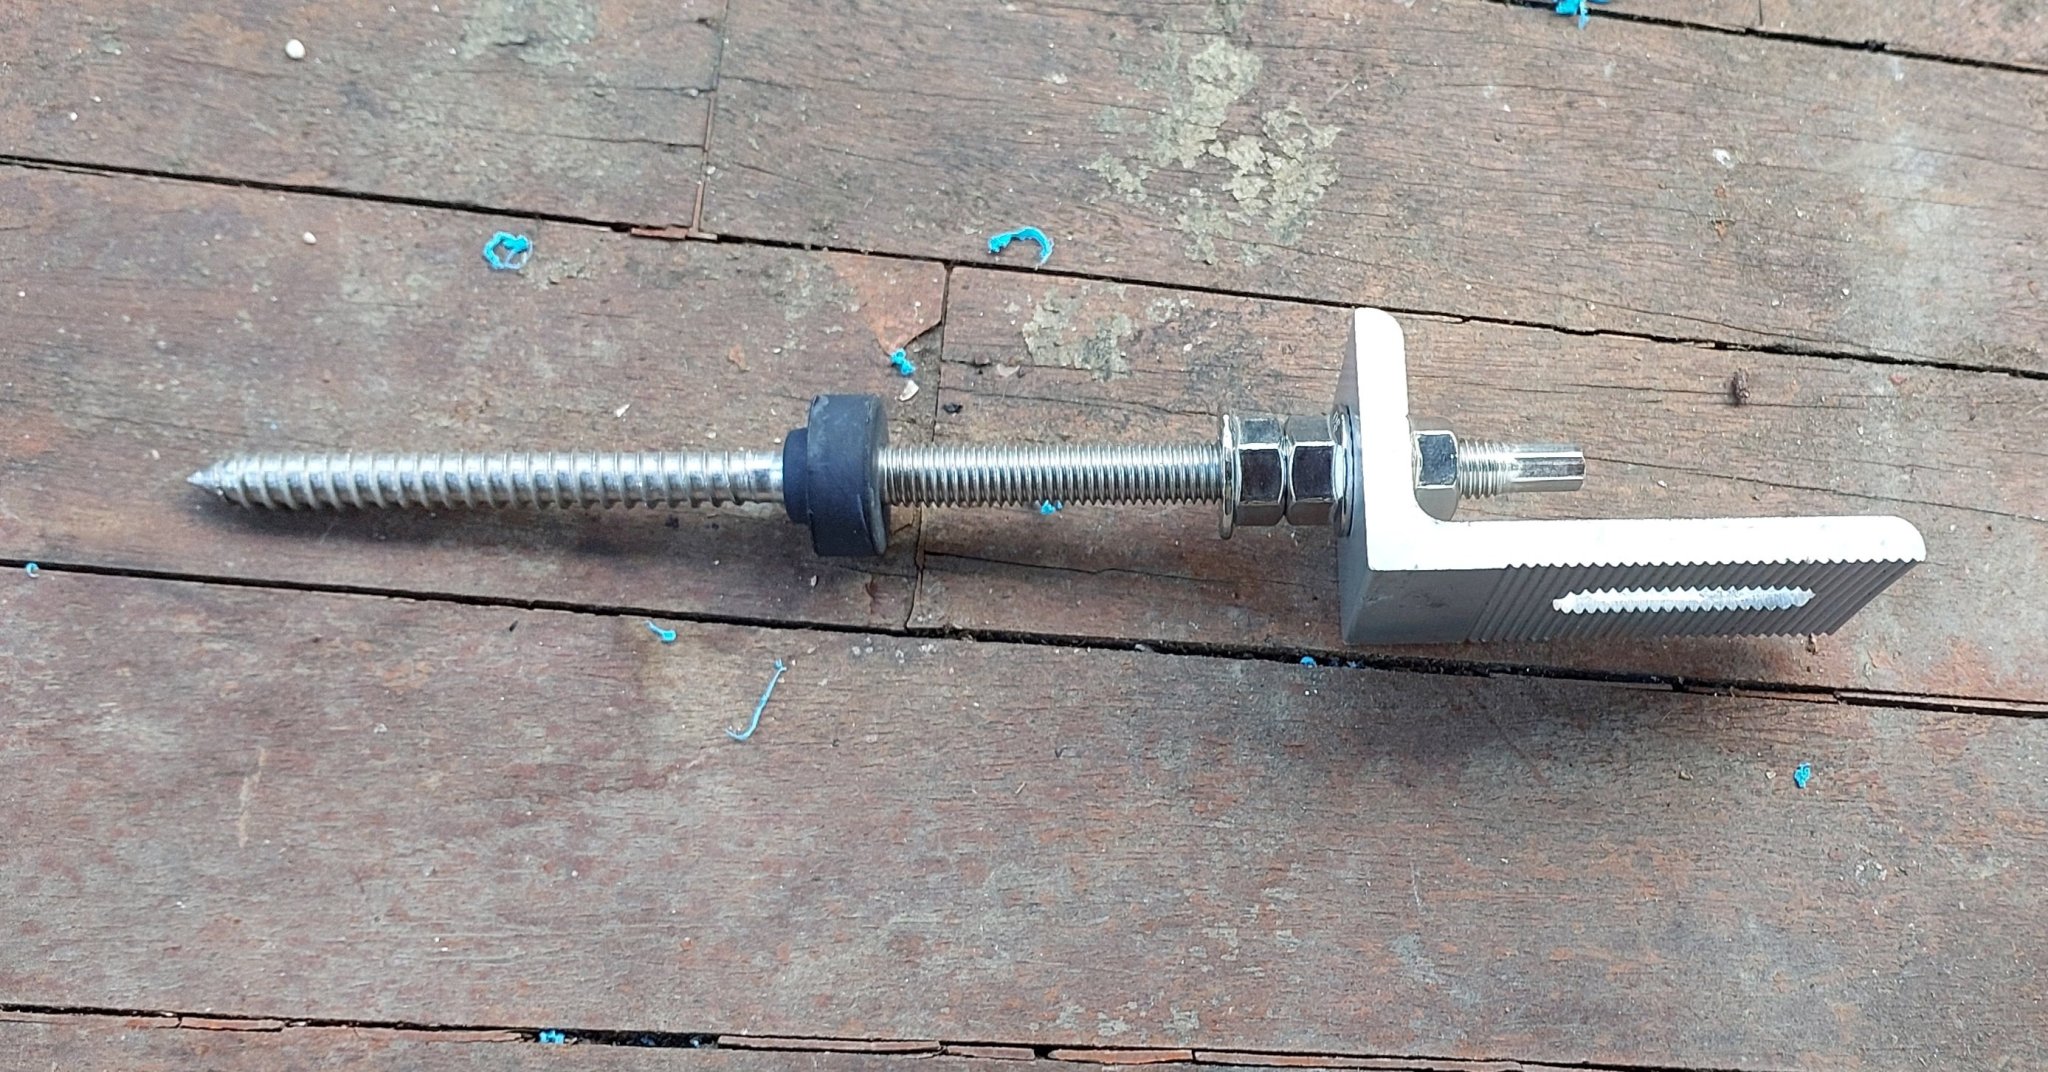
-
Solar power, can it be done DIY?
ThaiFig replied to Sophon's topic in Alternative/Renewable Energy Forum
OK, I understand now. The advantage that lifepo4 holds is that you can routinely run them with 90% DoD on a daily basis. With a single charge/discharge cycle daily, they will die of old age before they use up their cycles. If you limit yourself to 30% DoD on your carbon batteries, you end up with 3 of them for every lifepo4 (plus BMS) you are substituting. So in my case they would have to be 1/3 the cost of the same capacity lifepo4 battery/BMS combo to make economical sense. Perhaps that's the case, I don't know. Even if that's not true now, it could be in the future. Now that you've introduced them to me, I'll definitely keep them in mind for my next install. For this one, I've already started assembling the parts for a lifepo4 48 volt system. BTW - I'm seeing multiple promotions of Tier 1 550 watt panels for around 3000฿ online. Could be a good time to upgrade 😀 -
Solar power, can it be done DIY?
ThaiFig replied to Sophon's topic in Alternative/Renewable Energy Forum
45 Amps into a 750 Ah battery would take 16 hrs to deliver that much energy. .2C would be 150 amps. So you aren't rapid charging them after all, quite the opposite. So forget my last comments about longevity. If they reach a full state after only a few hours at 45 amps, they either don't really hold 750 Ah or, more likely, you aren't draining them very much overnight. -
Solar power, can it be done DIY?
ThaiFig replied to Sophon's topic in Alternative/Renewable Energy Forum
In your case charging ceases when target voltage is reached. But the longevity claims I've seen so far are with .2C charge rates. If you slow charge a battery at that rate, voltage will rise to the final level but the battery won't be full, it needs to be held to that final voltage till current drops to zero or thereabouts. This absorption period for lead acid is several hours. (Set the cutoff voltage too low with Lifepo4 and it will also require a lengthy absorption time). With your high rate of charge, you won't need that absorption time but I'm thinking your batteries will take a major longevity hit instead. Have you seen any data to support your belief that high C charge rates don't wear out your batteries faster? Just because you CAN do something doesn't always mean you SHOULD 😉. -
My DIY Solar Doghouse Project
ThaiFig replied to ThaiFig's topic in Alternative/Renewable Energy Forum
I used a website, go to https://globalsolaratlas.info/map?c=14.17173,101.635448,8&s=14.155751,101.054109&m=site to set the location, then the click on the link on the right after scrolling down to change the PV system parameters. It will give you the recommended angles as a default, but you can over-ride them to see what a less than optimum angle will give you. It can calculate both daily and yearly output. I was surprised by how little effect the changes had, when dealing with small amounts of tilt. It may even have a way to set different times of year to calculate monthly averages, but I didn't go that far into it. It was enough to see that adding a frame to change the angle from 6 degrees incline pointed north northeast to the recommended 16 degrees tilt pointed south didn't give me much extra for the additional expense. The boost from panel cooling has been well documented by others, misting from behind is my idea to minimize crud build up on the face and minimze amount of water needed. -
Solar power, can it be done DIY?
ThaiFig replied to Sophon's topic in Alternative/Renewable Energy Forum
5 hours to charge at .2C from sunshine is doable, but the 8 following hours of absorbtion would require power from the grid, defeating the purpose... I'd want to be able to more or less immediately follow the charging session with a .2C discharge to continue to function without resorting to the grid. Still, the idea of having a battery that almost duplicated the capabilities of a Lifepo4 battery at the price of a lead acid battery is intriguing. It's not something I would have considered, even though I know Lifepo4 batteries are likely to be obsolete by the time they reach the end of their useful life, having been replaced with a newer tech. So thanks for bringing them to my attention. How do you utilize them? Charge at a higher rate at the expense of future longetivity? -
Solar power, can it be done DIY?
ThaiFig replied to Sophon's topic in Alternative/Renewable Energy Forum
Interesting. Victron apparently has some as well. Here's what they had to say about them: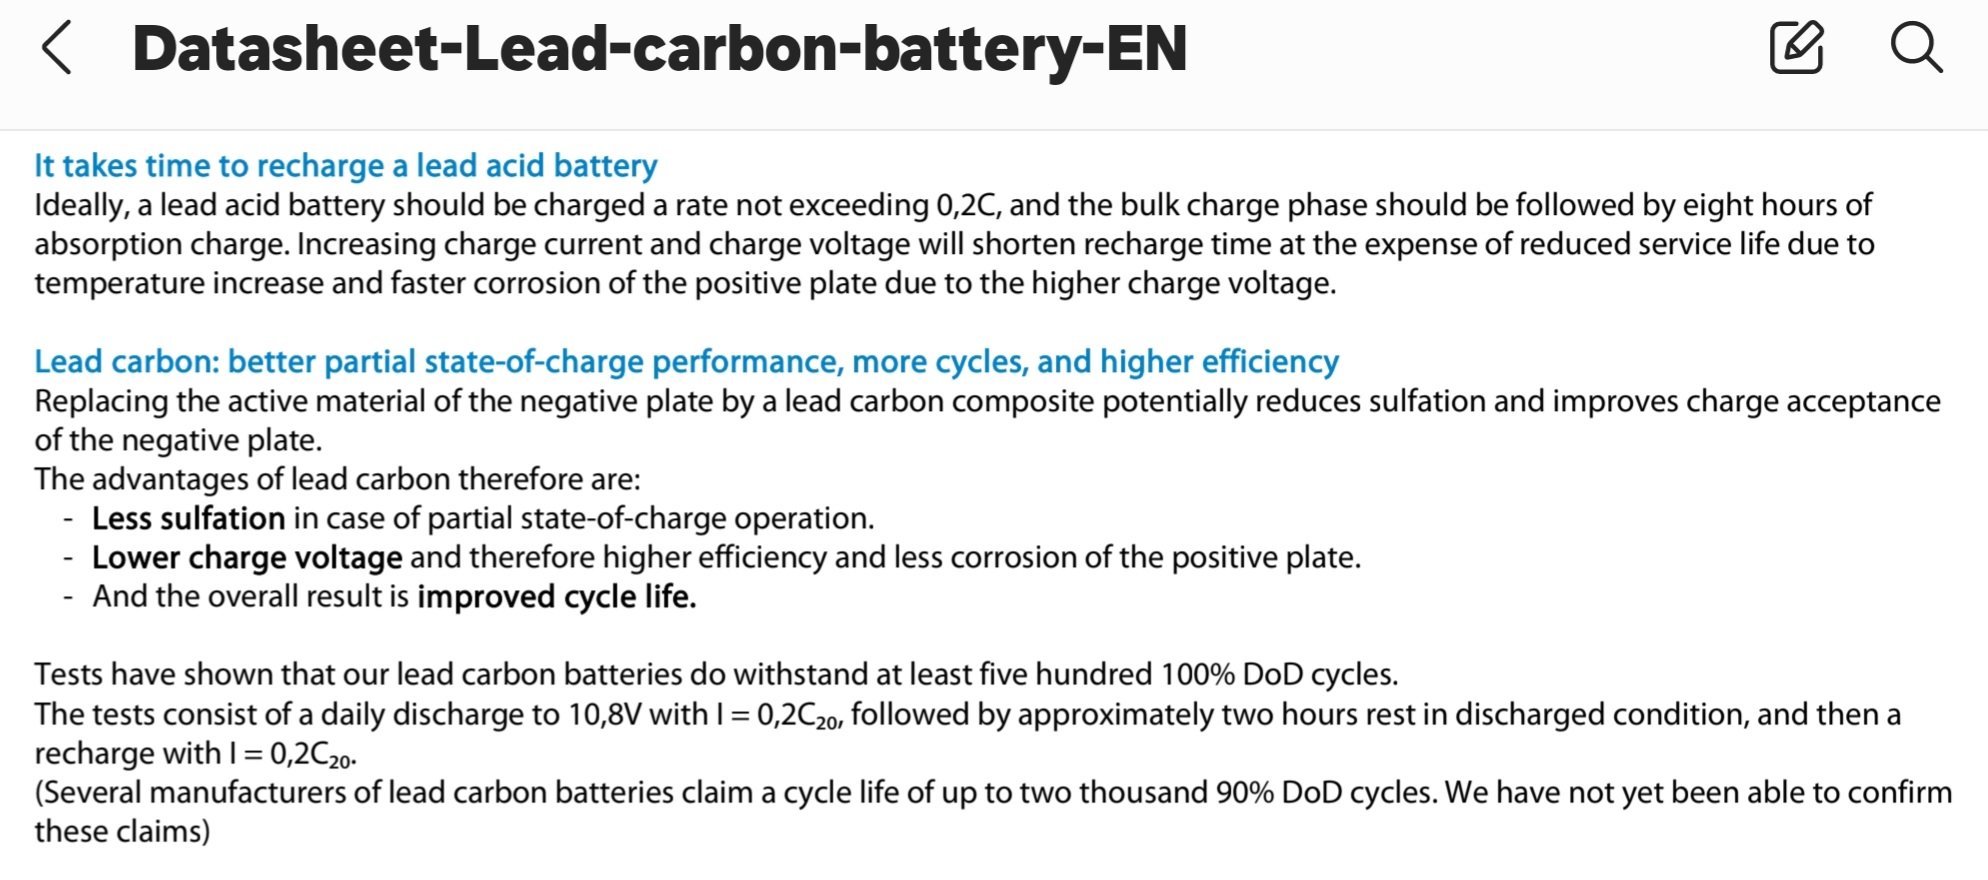
-
Solar power, can it be done DIY?
ThaiFig replied to Sophon's topic in Alternative/Renewable Energy Forum
Thanks 😊 -
My DIY Solar Doghouse Project
ThaiFig replied to ThaiFig's topic in Alternative/Renewable Energy Forum
I did a simulated calculation of the power generation based on Thailand irradiation. I found a very minor difference when I moved the panels around or tilted them more or less, such that I decided to leave them facing NNE at a 6° inclination. A bigger gain would come from installing an agricultural misting pump under the panels to cool them. We have so many overcast days here in Thailand that make the light non directional, that straight up is as good as any angle, and much less expensive than tiltable framing.