007 RED
-
Posts
936 -
Joined
-
Last visited
Content Type
Events
Forums
Downloads
Quizzes
Gallery
Blogs
Everything posted by 007 RED
-

Switch between grid and off grid system in same house
007 RED replied to Elik's topic in Alternative/Renewable Energy Forum
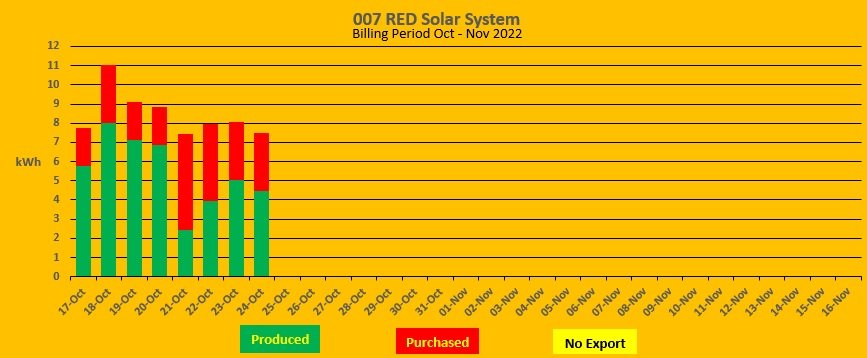
An interesting question. I think it’s not “if”, but “when”. That said, as TIT the “when” could be any time from tomorrow or sometime in the next millennium. Who knows? My small scale system (4 x 415 W panels connected to a 2.2kW GTI) in theory should be capable of producing 1.66kW under laboratory conditions. However, given that we are living in the real world, the system is more likely to produce about 1.2kW under good sunshine and assuming 6 hours of decent sunshine a day, the system should be capable of producing around 7 units a day ????. Although we have a range of household appliances, including a couple of air conditioning units, my wife and I are somewhat conservative electricity users. Prior to installing the solar system, PEA billing records for the previous 2 years indicated that we were using on average 10 units/day. So when I designed the system, I did so with the objective of the system being capable of producing a maximum of 75%, or 7 units/day, in order to avoid any risk of producing negative meter readings. The graphs below for the current billing period shows that our small scale system is currently producing 65% of our needs, leaving us to purchase 35% from the local PEA. It should be noted that weather conditions this month have been mainly overcast with the occasional heavy downpour, hence the somewhat lower than hoped for production yield ????. As I type this post, the monitoring facility is showing that the solar panels are producing 1.24kW and hence my meter is merrily whizzing around backwards due to the nice blue sky and nice bright sunshine ????. Obviously if the meter were to be replaced with an electronic type thus preventing backwards spinning, I will not be able to ‘store’ my surplus power in the grid for use when the sunshine disappears behind a cloud. I have noticed from the system’s monitoring facility that on the couple of days when my system is in the NO EXPORT mode prior to the meter reader coming, the system appears to almost keep ‘pace’ with our needs, except for short periods when we are using the shower heater, water pump or washing machine. I envisage that if/when the PEA install an electronic meter, because we are relatively low electrical users, we will only need to purchase a few additional units a month and I may well then consider installing an additional solar panel to compensate for the loss of 'free' storage convenience. Due to the high costs associated with hybrid systems, and our low consumption, I have no plans to go down the ESS route.
-
I was aware that the document relates to the 2013 regulations but I think you'll find that the 'rules & regs' are still the same, its just that they have amended the rates paid for FiT and the maximum amount of power feed-in that the PEA/MEA can allocate to individual providers. And yes, you also need a person who is professionally licenced to certify that the roof will support the weight of the solar installation ????
-
Assuming that the installer, or yourself, submitted the application in the first instance and all the required paperwork etc. I think it's about time to 'rattle a few cages' and collect some compensation for loss of income. I've attached below a PDF translated copy of the 'ERC Regulations on Thailand's Solar Rooftop Programme'. You will see from this document that if your system has been approved and the PEA have failed to pay you for power that you have generated, and you have complained to them, then you can escalate the mater to the the ERC HQ, who will investigate and give a ruling. If they find in your favor they will instruct the PEA to pay you what they owe plus interest. Obviously you will need to submit such a complaint in Thai and provide good backup evidence to support your claim. It may be worthwhile trying. Good luck. 20130918_giz_translation_solar_rooftop.pdf
-
Congratulations, a really nice installation. As you mentioned, l would definately raise the battery off the floor to avoid any 'rising damp'.
-
"no battery as yet" Just a heads-up...... I seem to remember another forum member who has had a Huawei inverter installed discovered after the fact that Huawei some how tie you into using only their batteries, which then turned out to be a very expensive option. Hope I'm wrong for your sake.
-
Today, 6/10/22, celebrates the 1st ‘birthday’ of my small scale grid tied solar system, so now is an opportune time to take stock and assess its performance during the past 365 days. Background The system comprises 4 x 415W half-cut mono panels connected in series to a 2.2kW Sofar grid tied inverter. The system was a DIY project, so there were no labour costs, just my time and effort. The total cost of the hardware worked out at a tad over 28,000 THB. We (my wife and I) consider ourselves to be ‘conservative’ electricity users with our bills, prior to installing the solar system, averaging around 1,000 THB per month. When I designed the system, I decided that the main objective of the system would be to reduce our electricity bills by approximately 75%. This would ensure that we didn’t get into a situation where the system generates negative readings when the meter reader calls. Under laboratory conditions, the 4 x 415W solar panels should be capable of producing 1.66kW, but of course were not living in a laboratory. In reality, the panels are more likely to produce around 1.25kW in good sunshine. Therefore, assuming 6 hours of good sunshine a day, the system should be able to produce (1.25 x 6) 7.5kWh a day, which is the figure that I considered to be the target for the system. What has the system achieved during its first year of operation? According to the system’s monitoring facility, it has generated 2,590kWh during the past 365 days, or an average of 7.1kWh per day. Attached below is a graph illustrating what the system has produced, and what we purchased, since 6/10/21 to date. I have also included what we purchased during the 9 months prior to the system becoming operational for comparison purposes. Looking at the graph below, it may be seen that we have slightly increased our consumption since the system became operational. I'll blame this on my better half who says that our electricity is free now ????. Since the system became operational it has produced approximately 70% of our household electrical needs, resulting in us only having to purchase about 30% from our local PEA. Although slightly lower than what I had hoped for, I still consider this to be perfectly acceptable, particularly given that the system was running in ‘NO EXPORT’ mode for nearly 3 weeks during May/June (See Note 1 below), and with very overcast conditions during late September/early October due to the monsoon season. Taking the cost of electricity as being 4.2 THB per unit (See note 2 below), the system has saved us (2,590 x 4.2) 10,878 THB during its first year of operation. Return on Investment If the system continues to produce the same output level over the next couple of years, it would be reasonable to assume that it will have paid for itself (28,000 / 10,875) in just over 2.5 years. Obviously if the price per unit of electricity increases, then the Return on Investment will be shorter ????. Problems Not wishing to speak to soon ????, but thankfully during its first year of operation there have been no major problems with the system. Shortly after turning the system on, I discovered that a MC4 cable connector (from the solar panels to the DC breaker box) was getting very warm. Upon investigation I realized that I had not fully crimped the cable inside the connector. Thankfully, this was identified/rectified before any real problems. Definitely my bad. The only maintenance the system has needed was to clean the panels on a couple of occasions to remove dust/dirt, although I’m not sure that this had any profound effect on the system’s performance. Will I up-grade the system? At this stage no. I’m very satisfied with the system’s performance and hopefully it will continue to provide a reasonable daily contribution to our electricity fund. If, and it’s a big if, the local PEA decide to replace our disc type meter with an electronic one, then I will have to seriously consider increasing the number of solar panels and possibly installing a second inverter. Note 1. I had to put the system into ‘NO EXPORT’ mode for almost 3 weeks during May/June because the new build house opposite was nearing completion and the electrical contractor had run the supply cables from the house to the pole outside our house, which also has our meter on it. As we had no idea how long it would be before the local PEA would come to install the meter for the new house we decided to go into a ‘safe’ mode, as we obviously didn’t want the meter installer to see the disc spinning backwards on our meter. Note 2. The figure that I have used (4.2 THB per unit) was the average that we paid per unit during the 9 months prior to installing the system. Note 3. On a light-hearted note. I recall a forum member some time ago suggesting that I was “penny pinching” by saving a few Baht a day. Well, I would ask, other than a ‘Ponzi scheme’, what investment is going to give me nearly 38% interest per annum.? If I was to put 28,000 THB into a basic bank savings account for the past year, I would be extremely lucky to get about 1,400 THB back in interest. Then to add insult to injury, whatever interest is paid would be automatically reduced by X% ‘with-holding tax’. So, at the end of the day a Return on Investment of 10,626 THB could well be considered a worthwhile payback.
- 1 reply
-
- 10
-

-

-

-