.png.3b3332cc2256ad0edbc2fe9404feeef0.png.8488ab72b8bb2e508209bfe3211b6e08.png)


007 RED
-
Posts
933 -
Joined
-
Last visited
Content Type
Events
Forums
Downloads
Quizzes
Gallery
Blogs
Everything posted by 007 RED
-
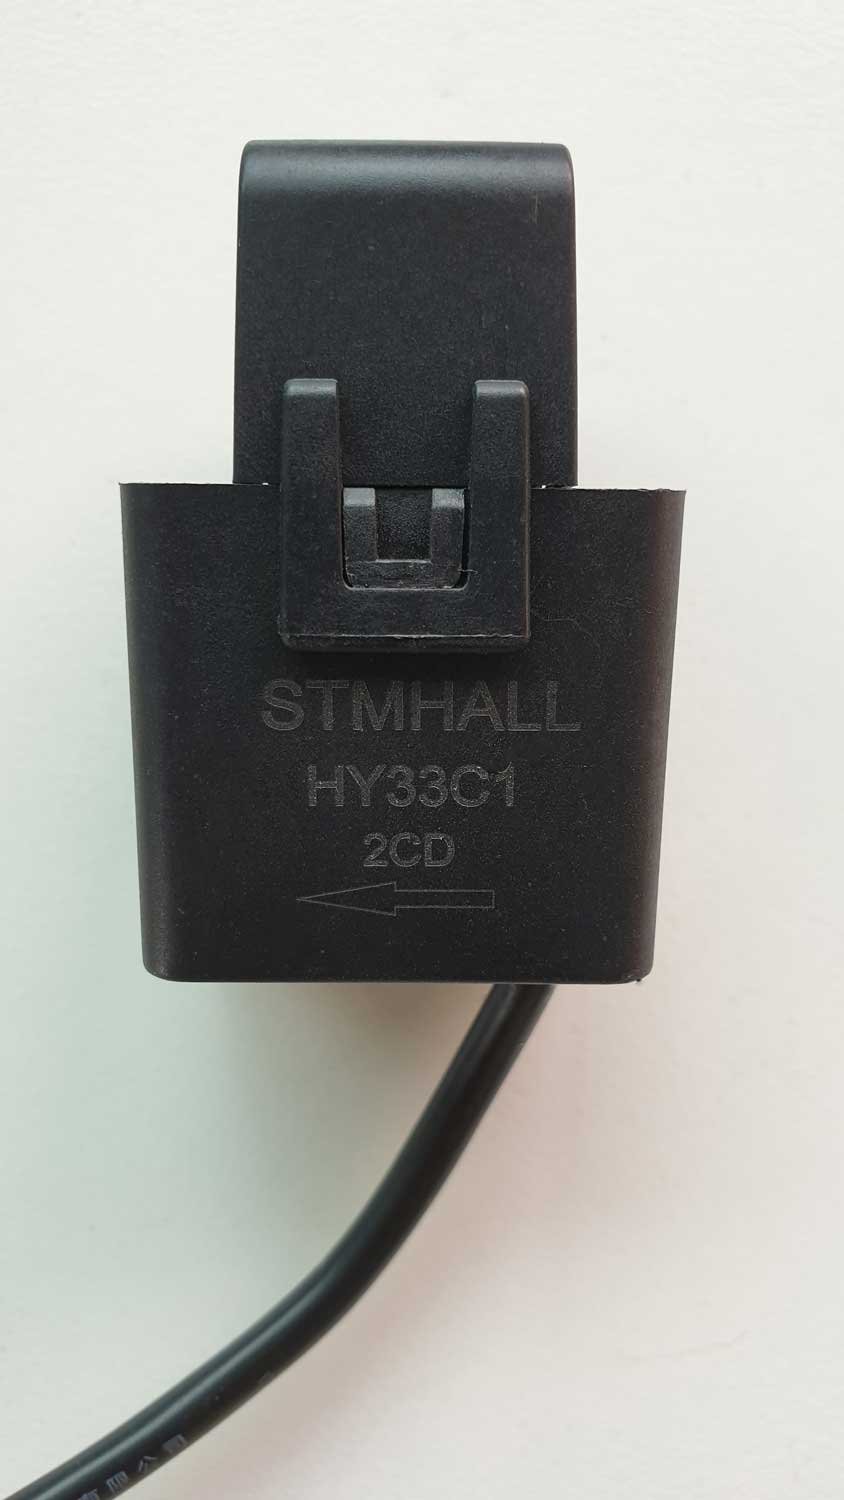
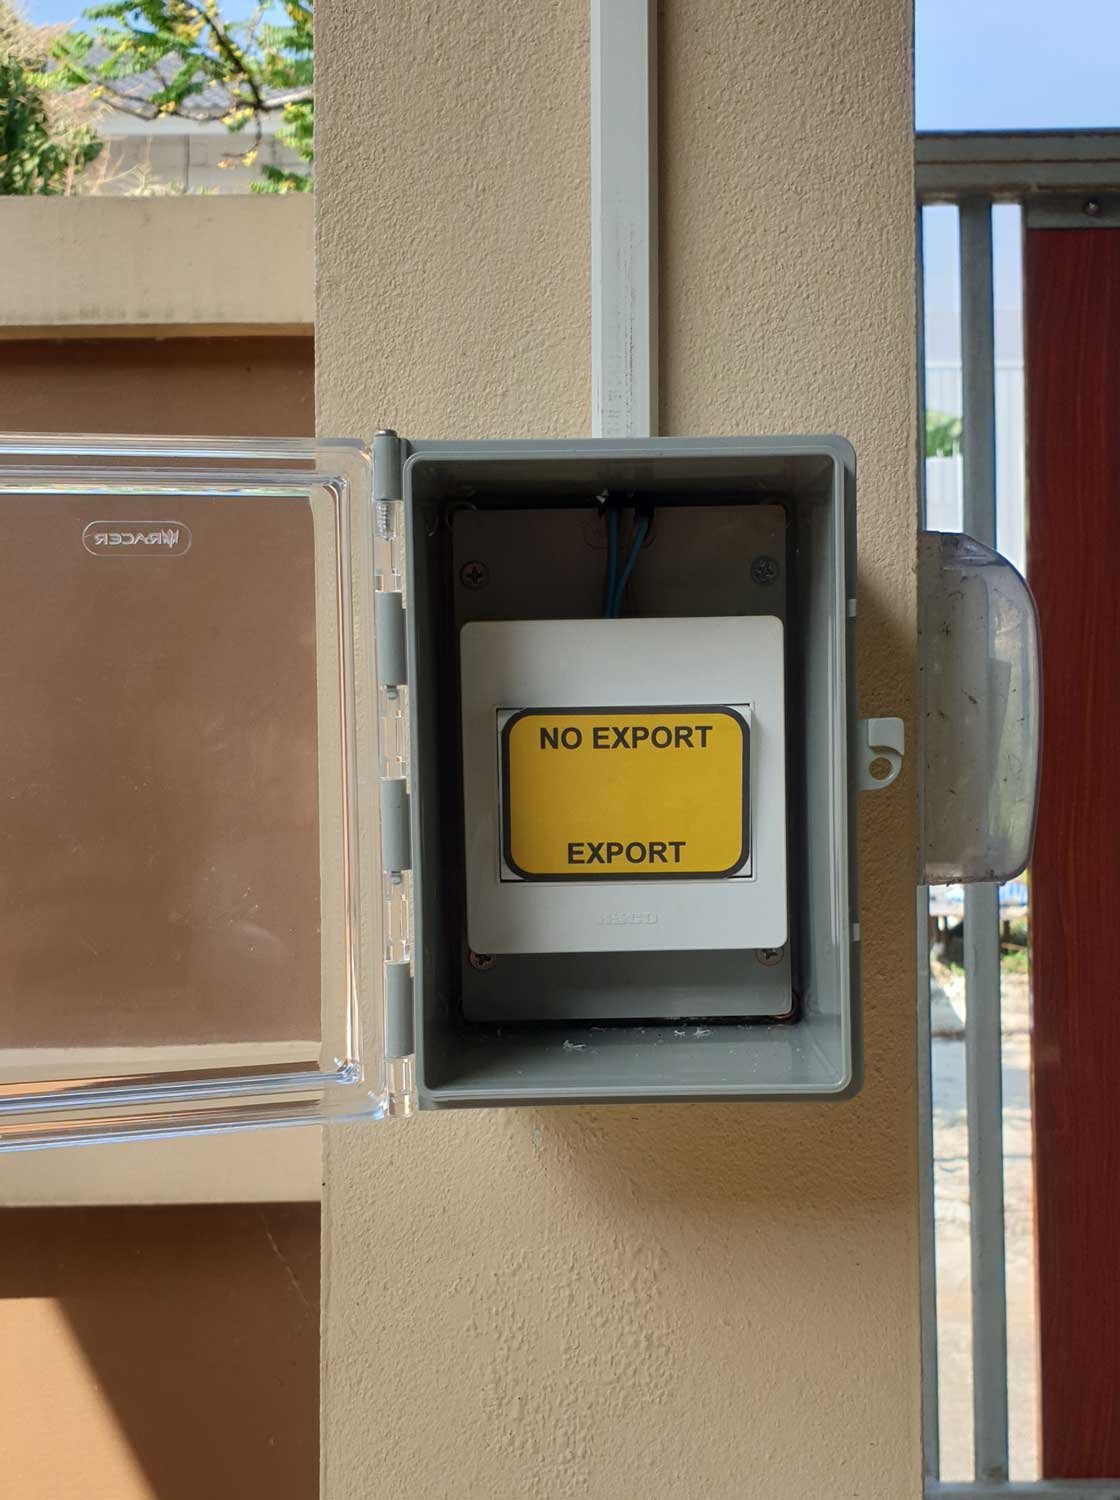
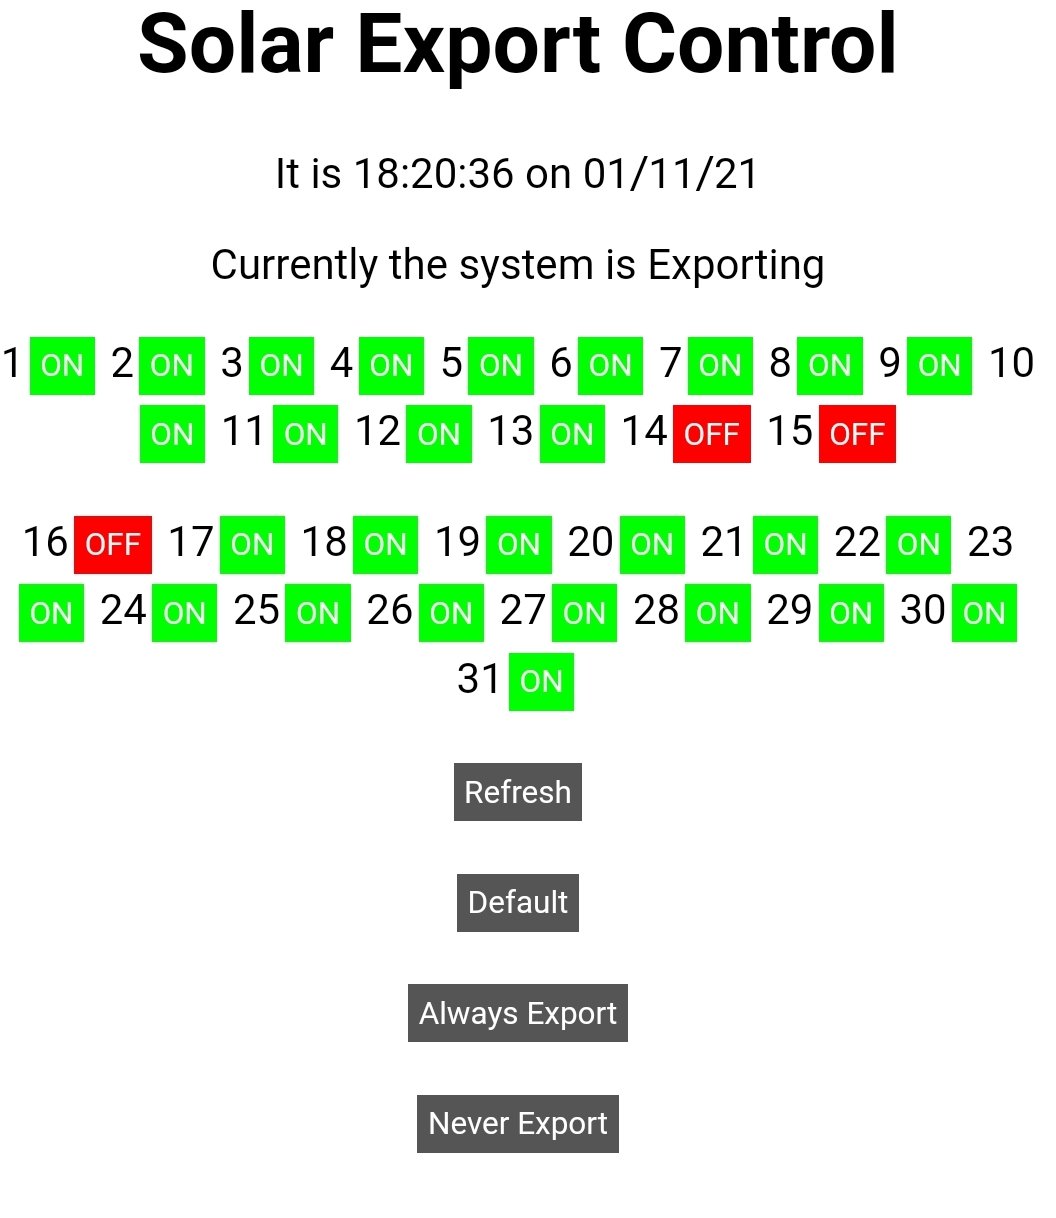
Yep..... you definitely want to make sure that your meter reader does not see the disc spinning backwards at a hundred mile an hour. The first task is to be aware on what day(s) your meter reader comes. If you're not aware, take a look at your past bills as this will give the meter reading date, or if you go to the PEA website you can obtain details of past readings for about a year or more. I think you will find that the meter reader normally comes within a couple of days 'window' so its best to power down until you get your system set up to not export. The first thing that you will need is a CT Clamp. Some models of Sofar inverters provide this in the box. If yours doesn't then you can get one via Shopee https://shopee.co.th/????ยอดขายอันดับ1-CT-กันย้อน-ตัวกันย้อน-1P-Grid-tie-On-grid-SOFAR-อินเวอเตอร์-กริดไทล์-ออนกริด-MPPT-Solar-โซล่าเซลล์-i.12941857.7171127309?xptdk=8b960a1c-d7a2-4435-9a63-4d0acf5fa17b This needs to be clamped over the Positive supply cable coming from your meter to the consumer box in the house. Note... it has a direction arrow engraved on the body of the clamp which must face towards the meter. The wires attached to the CT clamp are then connected to your CT input connection on the inverter. You will then need to set your inverter "REACTIVE" setting to zero. Don't ask why they have called it reactive as I don't know, but it's the setting which dictates how much power can be fed into the grid. With the CT clamp in place and the reactive setting set to zero, your inverter will not export, it will only produce enough (or less) power as is being used in the house. If you put a simple switch into the line from the CT clamp to the inverter, when the switch is open the inverter will export, when close it will not export. Its then a case of remembering when to turn off your export before the meter reader comes. I initially did this using a simple light switch housed in a box a shown below. I have subsequently adopted @Crossy NO EXPORT device which allows me to control the export facility via the internet as shown in the screen shot below. I hope this helps and good luck with rest of your project.

-
Firstly... well done in getting your system up and running. It looks a good job. Re: Country Code. If I recall correctly, Sofar inverters seem to be set at the factory with a country code # 22, which according to their spec sheet is for "General European" but I found that it seemed to work OK with this setting. That said, I did change a few days after initial commissioning to # 41 a which again according to their spec sheet is for "Thailand MEA" . I actually live in a PEA area, but the pain in the rear fiddling with the change button and passwords at every stage whilst up a ladder put me off changing it again to # 40. It works well and outputs the right voltage and Hz. Re: The Sofar monitoring system. I would recommend initially registering your system via the PC. I have attached below a link that will take you to the login screen. Just click on "Registration" (bottom right) and enter the details requested. It's a simple task. https://home.solarmanpv.com/login Once you've registered, then download an app for your phone via whichever app provider you have for your phone. The App is called SOLARMAN SMART. FYI... The phone app only provides limited data which cannot be manipulated. The PC version provides very comprehensive information and data which you can download and manipulate if you so desire. Good Luck.
-

ASEAN Sustainable Energy Week
007 RED replied to Encid's topic in Alternative/Renewable Energy Forum
I love the way that they describe this event "ASEAN SUSTAINABLE ENERGY WEEK". Since when have 3 days = a week? I know this is Thailand ! On a more serious note, thanks for posting this info. It sound interesting, and I'm fairly sure that I will be able to obtain a day pass from 'her-in-doors' to go along. Scrap the above.... I've just read the admission policy and its for trade and business visitors only... members of the public will not be admitted. Also all visitors must be properly attired, those in shorts and slippers will be refused entry... So that definitely rules me out ???? -
Reducing my house electricity costs – any advice please .
007 RED replied to Custard boy's topic in The Electrical Forum
As I mentioned in my post above, my small scale DIY solar system comprising 4 x 415W panels linked into a 2.2kW GTI cost 28,000THB and is producing about 7 units a day, that equates to approximately 11,000THB a year, which means that the system will have paid for itself in 2.5 years (sooner if they put the price of electricity up) and everything there after is a nice reward on the investment. Ask yourself a simple question. How much will your bank give you in interest on 28K THB in a savings account? I bet it wont be 11K THB per annum. -
Reducing my house electricity costs – any advice please .
007 RED replied to Custard boy's topic in The Electrical Forum
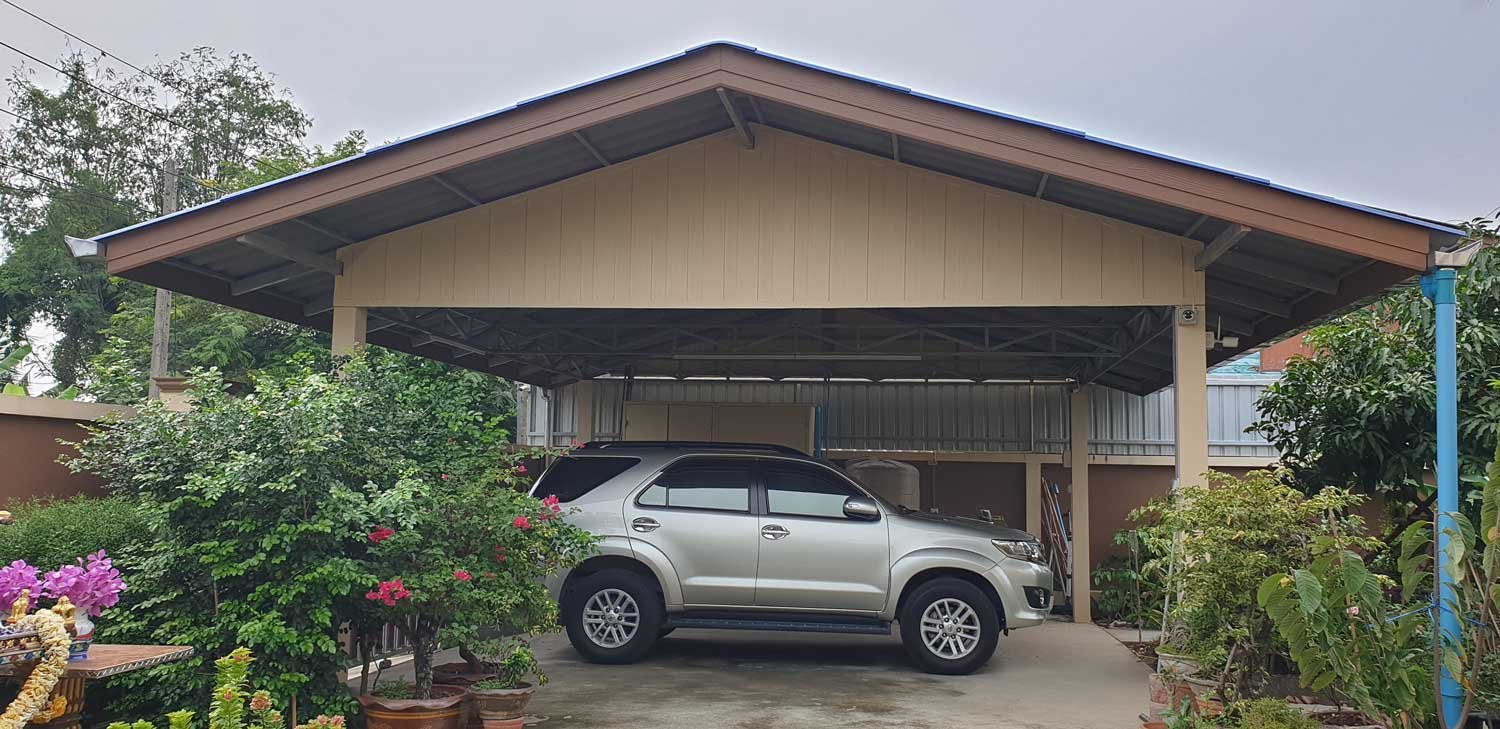
@Custard boy FYI..... Way back in 2019, whilst trawling through what was then Thai Visa I came across an interesting thread entitled “How about a solar car port on a budget” The thread rapidly expanded with helpful contributions from many forum members who shared Crossy’s interest, achievements and the odd disappointment. I confess to having no previous experience of solar systems and a fairly basic knowledge of electrical systems dating back to my days at Coventry Polytechnic some 50 plus years ago. In fact, I would happily describe myself as a total nerd when it comes to solar systems. That said, DIY seems to be in my DNA and Crossy’s thread inspired me to take the ‘bull-by-the-horns’ and consider doing something similar. We (my wife and I) had a car port constructed in 2018 on land that we purchased adjacent to our house. From the information derived from Crossy’s thread, the car port was ideally positioned in so far that one side of the roof was South facing and inclined was about 150. Most importantly it was not shaded during the day, therefore, any solar panels mounted on the roof should (in theory) capture maximum sunlight during the day. OK, so I was inspired by Crossy’s thread, but what was the motivation for me wanting to construct a small scale grid tied solar system on our car port roof? The cost of the electricity in Thailand is relatively cheap (especially when compared to the current cost in the UK), and my wife and I aren’t heavy consumers. Our average monthly bill being around 1,000THB. So, cost savings wasn’t really a major ‘driver’. Was it because going ‘green’ or ‘carbon neutral’ and saving the planet was the right thing to do? No not really. The amount of electricity we use is relatively small so it’s unlikely to make a massive difference to the world’s carbon footprint. That said, every drop of CO2 less should help. Oh, and one forum member suggested that saving just a few Baht a month was ‘penny pinching’. Well, if you consider the pathetic interest rate that you get from most bank savings accounts, compared to the potential cost saving per year generated by a solar system, solar out performs the interest rate by far, so I think it’s fair to say solar is in fact a shrewd long term investment. I think that the real motivation for me was that at the age of 74, designing, installing and commissioning a grid tied solar system, albeit a small one, was a great challenge. Throughout my life, I have always enjoyed the challenges which have been ‘thrown’ at me. Any long term financial payback, or contribution towards assisting the world to become carbon neutral would just be an incidental bonus so far as I was concerned. I ended up designing a small scale solar system on the car port roof with the ambition of reducing our monthly electric bill by no more than 75%. The installation comprises 4 x 415W Half-Cut monocrystalline solar panels linked to a 2.2kW grid tied inverter. In theory the panels (under ideal laboratory conditions) should be capable of producing 1,660W, but unfortunately we aren’t living a laboratory and in reality they can be expected to produce somewhere around 1,200W, which with good sunshine for around 6 hours per day will yield approximately 7 units . The graph below (from the system's monitoring facility) shows the solar panel output on a recent 'good day' when it achieved just over 8 units. The system cost me 28,000 THB (DIY installation) and it’s been running for almost a year now. As originally planned, the system has been reducing our electric bills by around 70% a month. I anticipate payback on the initial investment will be around 2.5 years - shorter if the price of electricity is increased. As I said earlier, a shrewd little investment. A few words of caution Firstly, it should be noted that the electric authorities (MEA or PEA) will not approve a DIY grid tied installation. According to their policies, all solar system installations which are connected to the grid must be undertaken by one of their approved installers and it must have an electronic meter fitted. The system must be subsequently certified by one of their engineers. The cost of having a system installed and approved is very expensive, and the payback for any power which the system might feedback into the grid is very low (approximately half that of the normal purchasing price). Secondly, if you DIY install a grid tied solar system and have a spinning disc type meter, any excess power produced by the system can potentially be fed back into the grid and make the disc spin backwards thus reducing the number of units used. This practice is frowned upon by the electric authorities and if discovered (usually by the meter reader) they (MEA/PEA) will at best replace the meter with an electronic one which prevents ‘spin back’ or at worse they may disconnect the supply and demand that the solar system’ be removed and/or impose a fine. Thirdly, if you create a system that constantly produces negative meter readings, that is to say the new reading is less than the previous reading, this will most certainly ring alarm bells within the MEA/PEA office, who undoubtedly will send an inspector to investigate the meter, which could result in the problems that I’ve described above. I hope this helps in your endeavour to reduce your electricity bill. Good luck.
-
How about a solar car port on a budget?
007 RED replied to Crossy's topic in Alternative/Renewable Energy Forum
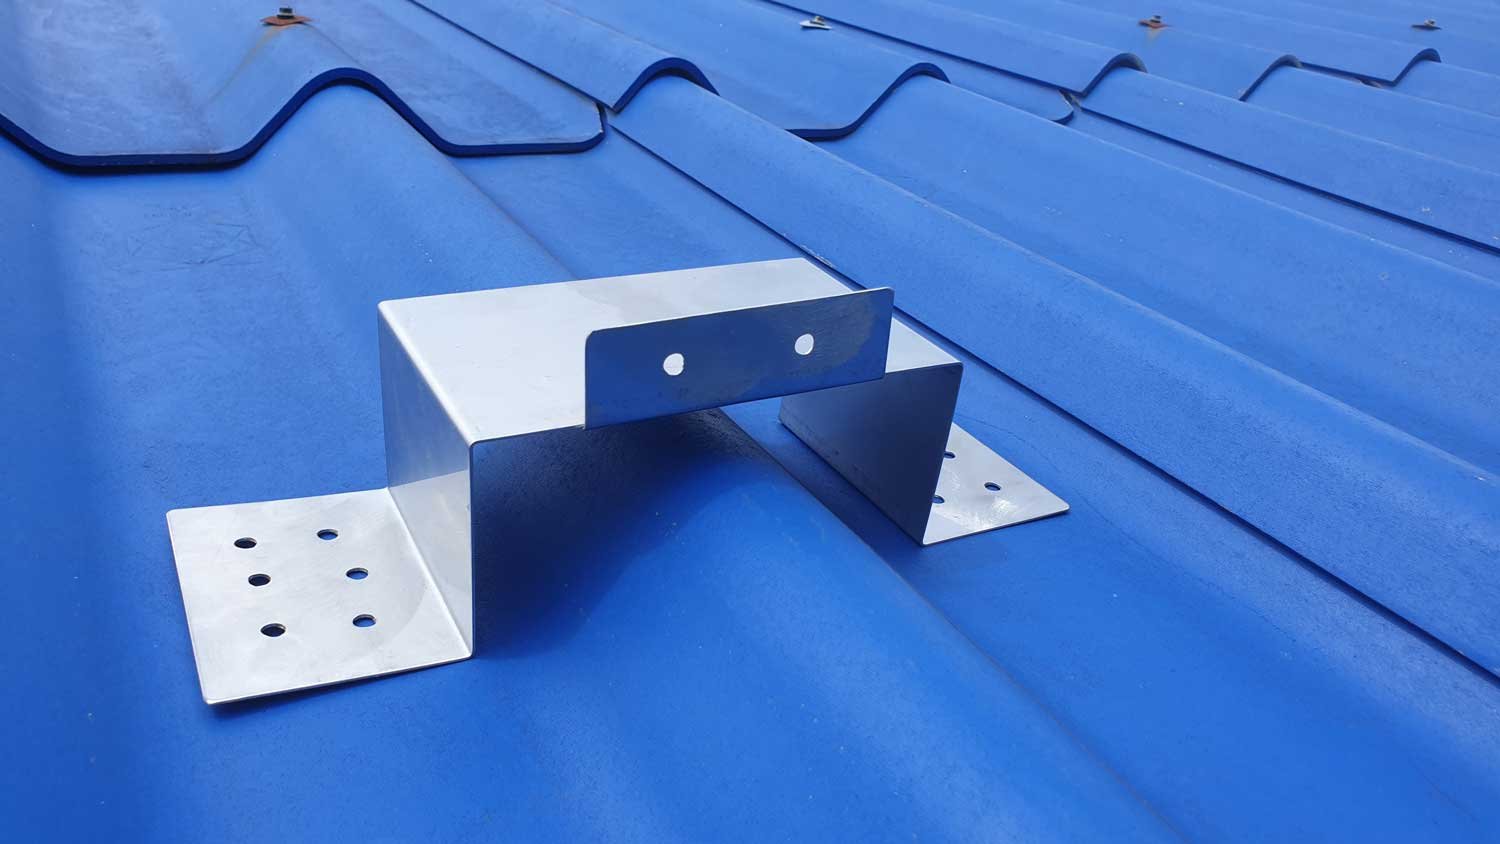
@Pink7.... FYI.. I adopted a slightly different approach for mounting my panels. I don't have access to a disc cutter, pedestal drilling machine or welding equipment, so I had to think of an alternative way to mount the panels onto the corrugated cement tiles of the car port roof. I opted to a 'bridge' type mounting solution as shown below. The mounts are made from 1.2mm stainless steel which are bolted down to the metal structure of the car port roof. They save a lot of weight. Made for me by a local tinsmith from off cuts @ 50 THB each. A small coat of clear silicon was applied to the underside of each bracket to help prevent any water ingression via the mounting bolts. Great advantage of stainless steel is that it won't rust and doesn't need painting = less maintenance. Been in service for 10 months and no problems with wind.
-
No problem... When we had the car port constructed on the land which we purchased next to our house, I had the electrician install a power supply from the house to the car port so that we would have a couple of power outlet points for small tools and lights in the car port. The connecting cable from the house is laid within yellow plastic pipe which is mounted around the garden wall to a small consumer unit under the car port. Approximate distance from house consumer unit to the carport consumer unit is about 40 meters (around the garden wall). I'm not sure about the technical spec of the cable, but it's 2 core and quite large. Because the envisaged output by my small scale system is only about 1.2kW (although the monitoring system has shown that on rare occasions it can push 1.5kW), I was given to understand from the forum experts that it was OK to connect the AC output from the inverter to my car port consumer box. And this is what I did, and it seems to have worked fine with no problems. I appreciate that my solution may not work for a larger scale system and maybe the resident forum experts will give advice on this. I hope that this helps.
-
I would second @Crossy advice above regarding checking everything with a multimeter before connecting cables... in fact... double check polarity. Also... ensure that your DC breaker is set to OFF position before connecting cables from PVs and from the DC breaker to the inverter DC input(s). Yup... sex of MC4 connectors can be confusing so good luck with them.
-
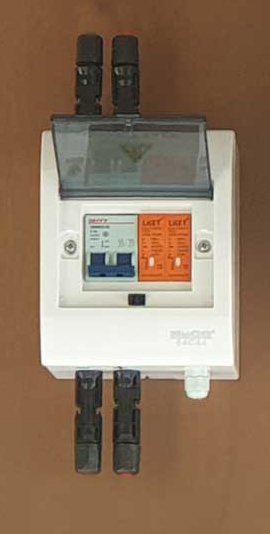
I remember that its a great feeling when all the parts start arriving. All you need to to now is get cracking and start building. Re: the feed cables from the panels that are mounted on the car port roof to the 'safety box'. The box was an empty 2 bay consumer unit that I purchased from HomePro for about 350 THB. I drilled a couple of holes in the top and a couple in the bottom of the case to allow the PV cable access/exit via MC4 connectors. The cables from the PVs are attached to the MC4 connectors in the top of the 'safety box'. The connectors are connected to their respective input (+pos and -neg) terminals on the DC MCB. The output cables (+pos and -neg) which are connected to their respective output terminals on the DC MCB are then attached to the MC4 connectors at the bottom of the 'safety box'. Additional cables then connect the DC 'Safety box' to the PV input sockets on the inverter. The DC surge protection device is connected to the DC MCB and an external earth feed. Sorry I don't have a photo showing the internal connection for the DC 'safety box', but hope that above description and photos below of the external boxes helps. Good luck with your project.
-
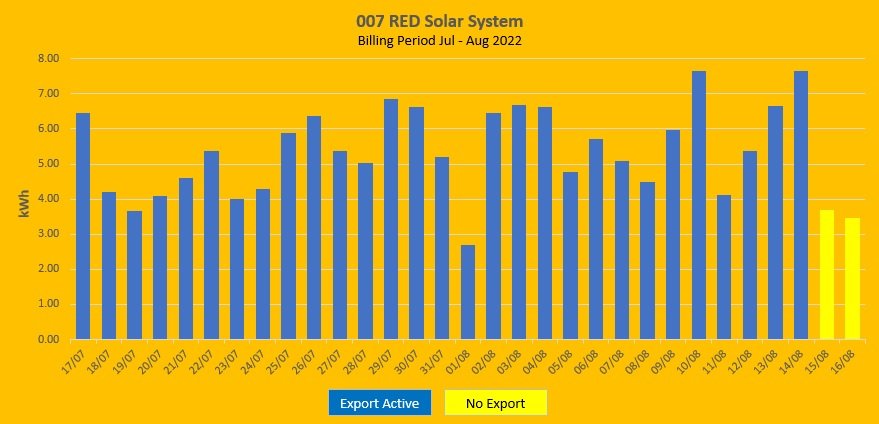
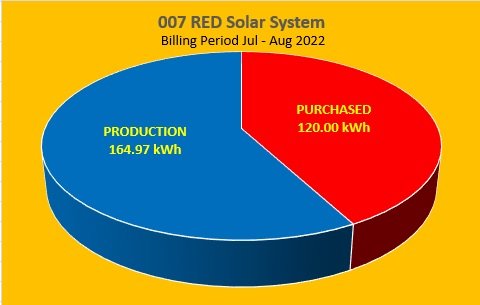
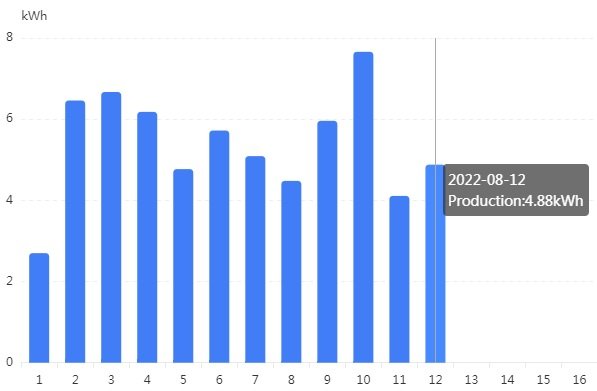
I totally agree. I think putting up some panels and connecting them to a few fairly cheap GTIs, like the ones that @Crossy or @BritManToo originally used, would serve as a good learning exercise for @PR3. My small scale GTI system comprising 4 x 415W half-cut mono panels connected to 2kW Sofar inverter and is merrily churning out electricity, even with the poor weather (lots of clouds, rain and thunderstorms) that we have been having during the past month. The system was originally designed with the aim of reducing my monthly bills by 75%, e.g. producing about 7 units per day. Below is the production data graph from my monitoring facility for the current billing period July – August. FYI…. The yellow bars on the 15 & 16 August indicate the days the system was switched to NO EXPORT as historically the meter reader can come on either of those days. This month the system only managed to produce just over 164 units, as shown in the pie chart below, which is better that nought. My system cost 28K THB and has been operational for 10 months now. It’s on track for a ROI in approximately 2.5 years and given the pending price increase of electricity announce the other day payback may be even sooner ????.
-
Growatt SPF5000ES Offgrid 9kw DIY Solar Project
007 RED replied to Pink7's topic in Alternative/Renewable Energy Forum
There it's straight now.... just for you ????
-
Growatt SPF5000ES Offgrid 9kw DIY Solar Project
007 RED replied to Pink7's topic in Alternative/Renewable Energy Forum
Is that the Phuket version? -
Growatt SPF5000ES Offgrid 9kw DIY Solar Project
007 RED replied to Pink7's topic in Alternative/Renewable Energy Forum
I've just looked back at the log which I kept when I did the installation of my small scale solar system back in October last year and I've found how I learnt about the SolarMan monitoring facility for use on my PC. The details were provided within the installation manual that was provided by Sofar, the inverter manufacturer. It was covered within the section of the manual that deals with "setting up the Wi-Fi option". The manual advised to open the Solarman portal website http://www.solarmanpv.com/portal/ This will take you to the login/registration screen. Click on register and complete the information requested. Once having completed the information, I bookmarked the login page to facilitate easy access. As mentioned previously, the PC version gives access to the full range of monitoring facilities, whereas the mobile app version provides the main information but does not allow the user to manipulate the data or visual outputs. -
Growatt SPF5000ES Offgrid 9kw DIY Solar Project
007 RED replied to Pink7's topic in Alternative/Renewable Energy Forum
Sorry @Sophon for the confusion.... my bad ????.... I omitted the 'R' from the word SOLARMAN. As you have indicated "SOLARMAN SMART" is available through Google Playstore specifically for use on Android mobile phones. FYI.... The mobile app has limited functions compared to the PC version. I can't remember how, or where, I got the PC app from, but I use the following https://home.solarmanpv.com/login to access the app through my PC. Hope that helps -
Solar power, can it be done DIY?
007 RED replied to Sophon's topic in Alternative/Renewable Energy Forum
Yep, my small scale system still seems to be able to produce something on 'bad' days like you have described, which is better than nothing. My system comprising 4 x 415W half-cut monos should in theory should be capable of producing 1.6kWh under ideal (laboratory) conditions,. However, because of potential efficiency losses I'm lucky to get 75% of the potential output, or 1.2kWh, even on a good sunny day. Under reasonably good sunshine days I would normally hope to achieve approximately 7 units per day. This month, almost every day, it has been overcast for most of the day, with occasional heavy downpours and thunder. The monthly output graph below shows that the system has been averaging about 5.5 units per day, which is about 75% of normal production on a good month. The worse day this month was the on 1st as shown in the above graph when it was very overcast all day, and we had a very heavy downpour and thunder storm which lasted several hours as can be seen by the big dip in the production graph below. Total production that day was only 2.7kW which as mentioned is still better than nought.
-
Growatt SPF5000ES Offgrid 9kw DIY Solar Project
007 RED replied to Pink7's topic in Alternative/Renewable Energy Forum
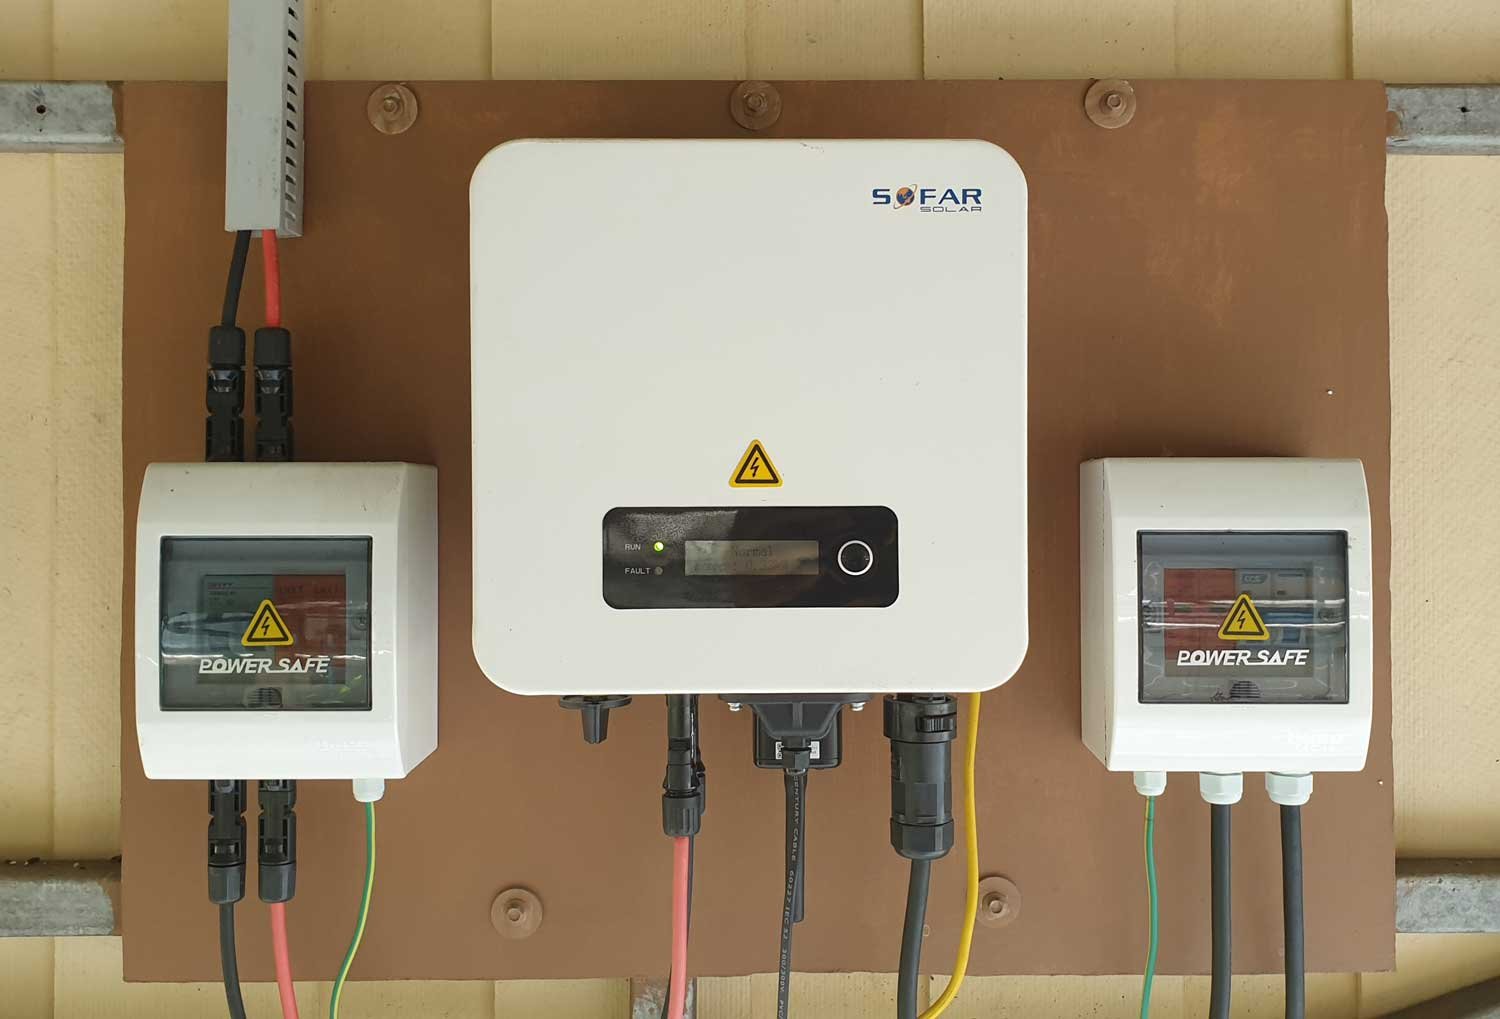
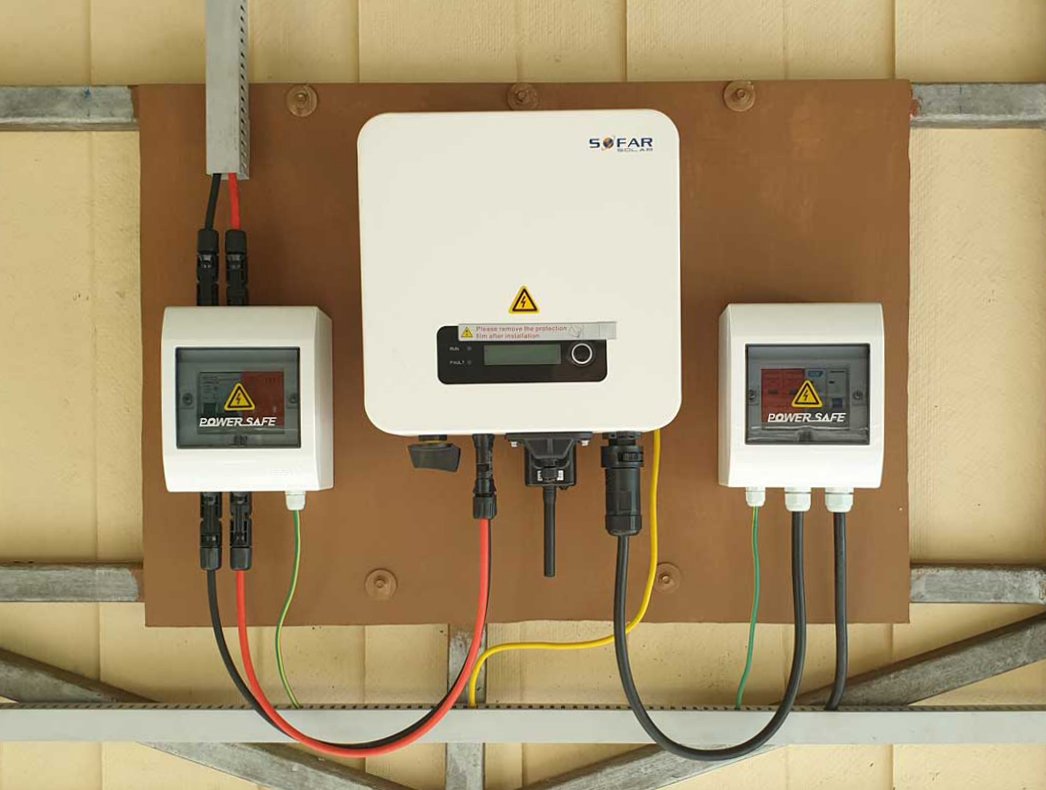
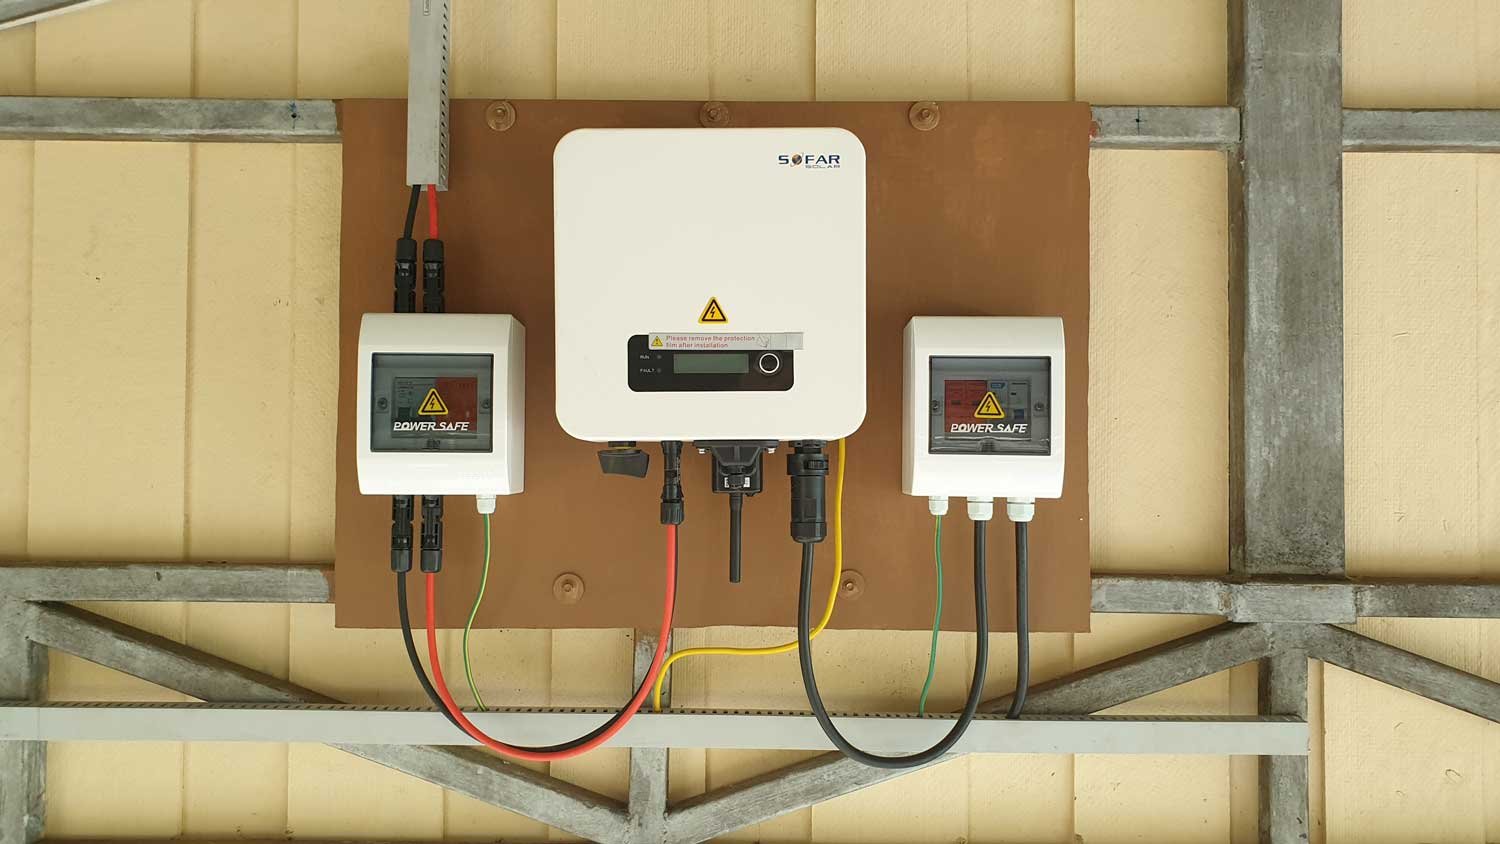
As has pointed out by @Muhendis and @Crossy, it is wise to have an appropriate breakers and surge suppressors located either side and as close to your inverter as practically possible. As has been mentioned, it is extremely important to only use a DC breaker on the DC side of the inverter and an AC breaker on the AC side of the inverter. Big flashes and magic smoke are likely to occur if you use an AC breaker on the DC side of the inverter. The breakers enable you to isolate the inverter from DC and AC supplies, so that you can carry out any maintenance on the panels or remove the inverter if necessary. The surge suppressors are there to protect your investment (inverter) in the event of a surge arising from a nearby lightening strike or problems with you local PEA supply. The photo below which I provided in an earlier post shows my small scale set up with the Sofar GTI inverter in the centre. The cables coming down from the top left of the picture are the DC +/- feeds from the 4 x 415W (connected in series) solar panels mounted directly above on the roof of the car port. These cables are connected to the DC breaker and and surge suppressor which are housed in my home made 'safety box' (small empty consumer unit box). From the DC breaker the +/- cables are then connected to the respective input DC sockets on the inverter. With your proposed setup you would have two feeds coming from your solar panel array, e.g. PV1 and PV2, each of which should be connected to their own DC breakers and surge suppressors before being connected to the inlet connections on the inverter. The large black plug and cable coming out the bottom right of my inverter is the AC cable which is feeding power generated by the inverter to my house consumer unit. This cable is initially connected to the AC breaker and suppressor, again in a home made 'safety box' before being connected to the consumer unit in the house. FYI.... Both 'safety boxes' and the inverter have separate earth cables which are connected to the metalwork of the car port. The metalwork inside the main supports of the car port are buried quite deep " meters plus) into the ground, but I have also connected a 2 meter earth rod buried in the soil to the car port metalwork. 'Belt and braces' approach. I hope this helps with your proposed project.
-
Growatt SPF5000ES Offgrid 9kw DIY Solar Project
007 RED replied to Pink7's topic in Alternative/Renewable Energy Forum
My 2kW Sofar GTI came with plug-in Wifi module which enables the inverter to send a fairly comprehensive range of performance data to a remote server (in China) via my router. It appears that the remote server 'calls' for data from the inverter about every 5 minutes. I can access the inverter's data through either an application on my phone or on my PC. The 2 apps provide slightly different outputs and are very easy to use. The mobile app is fairly basic, whereas the PC is very comprehensive with a wide range of visual and numerical outputs, some of which can be modified to suite your needs. The PC version also allows me to download all the system data into an Excel spreadsheet which I can, if required, produce various graphs etc. to meet my needs. FYI... Both apps are recommended by the inverter manufacturer (Sofar). The PC app = "SOLAMAN" and the mobile app = "SOLAMAN SMART" NOTE: The monitoring facility does not provide information on the performance of individual panels, it only provides data on the overall output performance of the array. I hope this helps. -
Growatt SPF5000ES Offgrid 9kw DIY Solar Project
007 RED replied to Pink7's topic in Alternative/Renewable Energy Forum
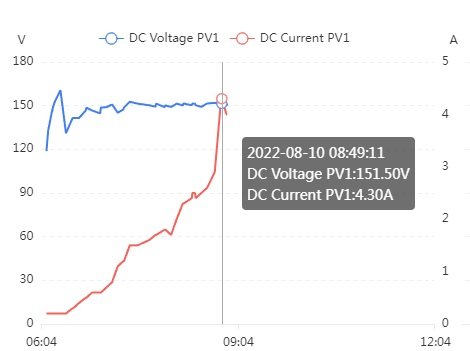
Just to illustrate the point that @Crossy has made above. The graph below shows the voltage and current output from my small scale system (4 x 415W panels) taken a few minutes ago. Yesterday at about 12:30pm, the voltage was about the same, but the current had risen to 10A thus producing about 10kW.
-
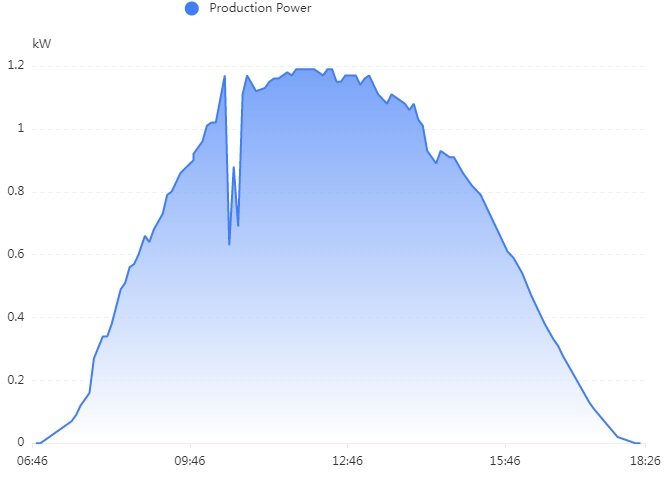
I’m not surprised by your figures. Sun rise is normally about 6am, so mid-morning is about 9am. If I remember correctly you have 9 x 330W panels which in theory are potentially capable of producing nearly 3kW under ideal conditions, so producing 1kW at 9am with good sunlight is fairly reasonable for a system of that size. FYI.... My small scale system (4 x 415W panels =1.6kW) has also produced nearly 1kW at 9am on a few occasions when the sun has been really strong. I’ve also seen the system peak at 1.5kW on a few occasions at mid-day.
-
Solar power, can it be done DIY?
007 RED replied to Sophon's topic in Alternative/Renewable Energy Forum
You will find that MC4 plugs and sockets are commonly used for connecting the solar panels and as shown in my case the cables from the panels to the DC 'safety box', and the outlet from the DC 'safety box' to the inverter. The inverter came fitted with the DC input socket and a plug (both MC4). All the panels came with 4mm cables with MC4 plug or socket attached. I could have used 4mm cable to run from the panels to the DC 'safety box'. Because of the length between the furthest panel and the DC 'safety box' I decided to use 6mm instead of the normal 4mm in order to reduce any voltage drop. The MC4 connectors will take a 6mm cable. You will also find a lot of "how too" videos on Youtube showing how to make an MC4 connection. I would certainly endorse @Crossy comment regarding investing in a good quality crimping tool to ensure that you have a good strong/tight connection. It will also save you a lot of time fiddling around with pliers if you have a few connections to make. A good investment so far as I was concerned. FYI.... When I was installing my system, I checked the continuity of all connections with an AVO meter. During the commissioning of the system I discovered that one of the MC4 connectors at the inverter was getting quite warm. Close examination showed that I had not crimped the cable in the correct place. I'm not sure, but if I had not double checked everything I suspect that this could have caused a real problem. -
@Encid You are 100% correct when you state that the output rating a solar panel (e.g. 340W or 450W) is determined under ideal (laboratory) conditions. Basically this is a specific light source shining directly perpendicular onto a given area of photo cells within the panel. Also, the temperature of the photo cells within the panel is maintained at a constant 250C during the tests. The biggest efficiency loss of solar panels is created by heat generated by the radiated light from the sun. At mid-day, with the sun overhead, and no haze or clouds it is possible for the temperature of the panels get up to 70 or 800C,. For every 10C above the laboratory test figure of 250C, the efficiency of the panel will reduce by x%, where x% is the temperature co-efficient of the panel which can be between -0.2% to -0.5% depending upon type of panel and manufacturer. Obviously the lower the the figure the better. Other solar panel efficiency losses as you indicate can be caused by cloud, haze, dirt etc. which added to the loss cause by heat can be as much as 25%. It is therefore, generally recommended to build in a potential loss of 25% when calculating the size of a system. For example, when I designed my small scale system I wanted it to produce a maximum of 7 units per day. Based upon a 6 hour day, that means the panels need to produce 1.2 kWh. The panels I choose were rated at 415W, so 4 x 415W should potentially give 1.660 kWh. But because of a potential loss of 25% in reality they are more likely to produce my desired 1.2 kWh. My small scale system has been running for almost a year now and the monitoring system shows an average daily production of between 6.5 and 7 kWh per day. FYI.... 6 hours is normally used for sun calculations as there is very little power being generated by the panels between sun rise and mid-morning, and mid-afternoon and sun set. I'm not sure what you mean by the timeframe for the nameplate output Wattage. All I can assume is that if the panel is rated at say 450W, in theory (lab conditions) it should be capable of producing 450W with a given light source. The 450W will only be produced so long as that specific light source is available to the photo cells of the panel. The graph below from my monitoring facility shows the output of my system during the day a few weeks ago and it clearly shows dips when the sun was obscured by heavy clouds and rain, hence loss of power. On this particular day the system only managed to produce about 3.75 kWh. I hope this helps.
-
Solar power, can it be done DIY?
007 RED replied to Sophon's topic in Alternative/Renewable Energy Forum
@Sophon, As @Crossy has pointed out above, it is wise to have an appropriate breakers and surge suppressors located either side and as close to your inverter as practically possible. As has been mentioned, it is extremely important to only use a DC breaker on the DC side of the inverter and an AC breaker on the AC side of the inverter. Big flashes and magic smoke are likely to occur if you use an AC breaker on the DC side of the inverter. The breakers enable you to isolate the inverter from DC and AC supplies, so that you can carry out any maintenance on the panels or remove the inverter if necessary. The surge suppressors are there to protect your investment (inverter) in the event of a surge arising from a nearby lightening strike or problems with you local PEA supply. The photo below which I provided in an earlier post shows my small scale set up with the Sofar inverter in the centre. The cables coming down from the top left of the picture are the DC +/- feeds from solar panels which are mounted directly above on the roof of the car port. These cables are connected to the DC breaker and and surge suppressor which are housed in my home made 'safety box' (small empty consumer unit box). From the DC breaker the +/- cables are then connected to the respective input DC sockets on the inverter. The large black plug and cable coming out the bottom right of the inverter is the AC cable which is feeding power generated by the inverter to my house consumer unit. This cable is initially connected to the AC breaker and suppressor, again in a home made 'safety box' before being connected to the consumer unit in the house. FYI.... Both 'safety boxes' and the inverter have separate earth cables which are connected to the metalwork of the car port. The metalwork inside the main supports of the car port are buried quite deep " meters plus) into the ground, but I have also connected a 2 meter earth rod buried in the soil to the car port metalwork. 'Belt and braces' approach.
-
Solar power, can it be done DIY?
007 RED replied to Sophon's topic in Alternative/Renewable Energy Forum
Hi @Sophon, again FYI…. At present the price of solar panels is quite high compared to this time last year. This has been in no small part due to the worldwide shortage of silicon chips which may have something to do with various sanctions being placed on China who are the biggest manufacture of chips and in our case solar panels. Last year when I purchased my 415W, monocrystalline half cut panels they were approximately 3,800 THB each at a discount price including delivery. Today they appear on the web to be around 5,200 THB each (delivery fee not known). I see from your initial, and a subsequent post, that you are considering 330W solar panels, and I note that you once asked for a clarification between the different types of solar panels. So here's some basic information for you. The most common types of solar panels used for both home and commercial installations are monocrystalline and polycrystalline panels, often referred to as mono and poly panels respectively. FYI…. There are other types of panels, for example; Passive Emitter and Rear Cell (PERC) panels and Thin-Film panels, but these are very expensive and tend to be used in specialist applications. All solar panels have the same purpose namely, to convert sunlight into electricity. However, the crystalline structure of the individual cells, which make up the solar panel, determines the overall performance of the panel. Monocrystalline panel cells are produced from a single silicon crystal, whereas polycrystalline panel cells are manufactured from multiple silicon fragments which have been fused together. By virtue of their manufacturing process, monocrystalline solar panels have a higher conversion efficiency than their polycrystalline counterparts, which means that they (mono panels) can potentially produce more kilowatt-hours of electricity for a given area of panel than their poly counterparts. However, because monocrystalline panels more complex to produce they are more expensive. FYI…. Monocrystalline panels are black in colour, whereas polycrystalline panels are blue. A very important factor if you are colour conscious about your installation. Although the physical size (height/width/thickness) are fundamentally the same, panels can be described as being full or half-cut. This describes the configuration of the individual cells which make up the panel. Half-cut panels are less prone to efficiency loss due to shading, dirt, miss match of cell etc than their poly counterparts. Looking at the Globalhouse website for example, you will see they have various solar panels advertised. https://www.globalhouse.co.th/catalog/catagory/125/1 So based on your desired panel output of approximately 18kWh, you could be looking at: 12 x 330W poly panels @ 4,000THB each = 48,000THB, or 10 x 410W mono half-cut panels @ 5,190 each = 51,900THB, or 9 x 450W mono half-cut panels @ 5,600 each = 50,400THB. Given that mono half cut panels are more efficient, you may wish to consider them and going for the higher W as there is only a couple of thousand THB in it and it will mean you need less mountings and cable etc -
Solar power, can it be done DIY?
007 RED replied to Sophon's topic in Alternative/Renewable Energy Forum
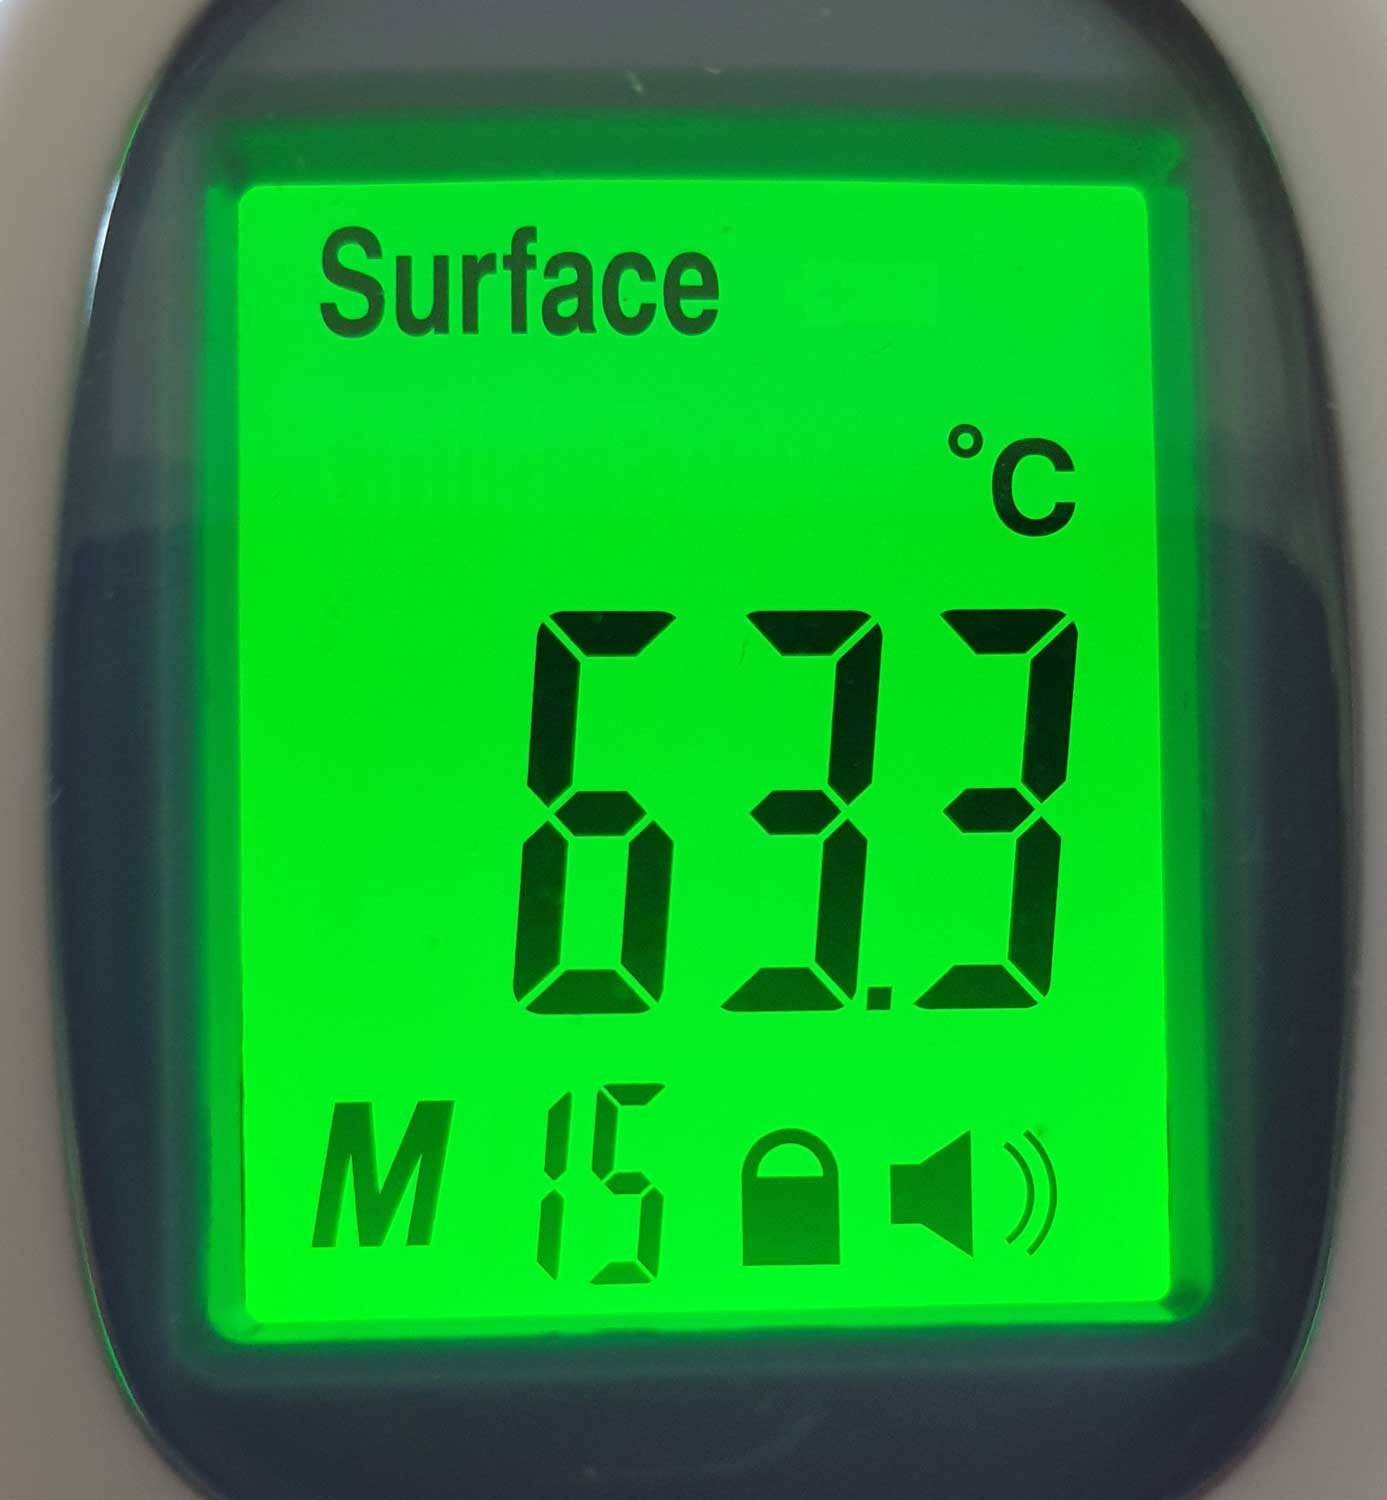
Hi @Sophon, me again. I see from your original, and a subsequent, post that you mention that you are thinking that 10 or 12 x 330W solar panels will be sufficient for your needs. Are you sure? Potentially 12 x 330W panels should in theory give you almost 4,000W (4kW) output. Assuming 6 hours of good strong sunlight per day. The key word in this statement is theory. It should be borne in mind that the panel’s rating (e.g. 330W) has been determined under ideal laboratory controlled conditions with a specific light source being directly perpendicular to the panel photocells, and the temperature of the panel being maintained at 25oC. Unfortunately, ideal conditions rarely exist in the big bad world and the rating figures provided by the panel’s manufacturer may well be much higher than is achievable in a ‘real world’. The losses in the panel's efficiency are attributed to the following factors. Firstly as you will appreciate the sun is constantly moving throughout the day from East to West, and depending upon the time of the year it may be closer to, or further away from, the Southern horizon at any given time of the day. As a result, it highly unlikely that the sun’s rays will be hitting the photocells within the panel(s) perpendicularly for much time during the day unless your panels are mounted on a very expensive tracking system. As a consequence, the panels will lose some of their potential output efficiency. Secondly, solar panels can get quite hot from the heat which is radiated from the sun which can make the temperature of the panels raise to as much as 700C or 800C. Unfortunately, the hotter the panels become the greater the loss of the panel’s potential efficiency. Below is a reading which I took with a basic handheld electronic thermometer of my panels at mid-day on a good sunny day. Admittedly not totally scientifically accurate, but it makes the point. The panels were certainly far too hot to touch. Thirdly, reductions in the panel’s efficiency will occur due to shading caused by buildings, trees, clouds/haze or dirt/dust accumulating on the panel and blocking the sun’s rays from reaching the panel’s photocells. Apparently, it may be reasonably assumed that a system might lose as much as 25% of its efficiency due to a combination of the above mentioned problems. Hence, assuming that 12 x 330W panels should in theory produce almost 4,000W, in practice (assuming a 25% loss) they are more likely to produce just 3,000W. Also when calculating how many units (kWh) the system will produce a day, it is advisable to work on 6 hours of good strong sunlight a day as the panels are only likely to produce minimal output between sun rise and mid-morning, and between mid-afternoon and sun set, as will be seen from the graph below taken from my small scale system in February this year. I appreciate that you may well be aware of the points I've made above and taken them into account in your calculations. In which case I apologise for pointing out something that you were aware of. Again, good luck with your proposed project.
-
Solar power, can it be done DIY?
007 RED replied to Sophon's topic in Alternative/Renewable Energy Forum
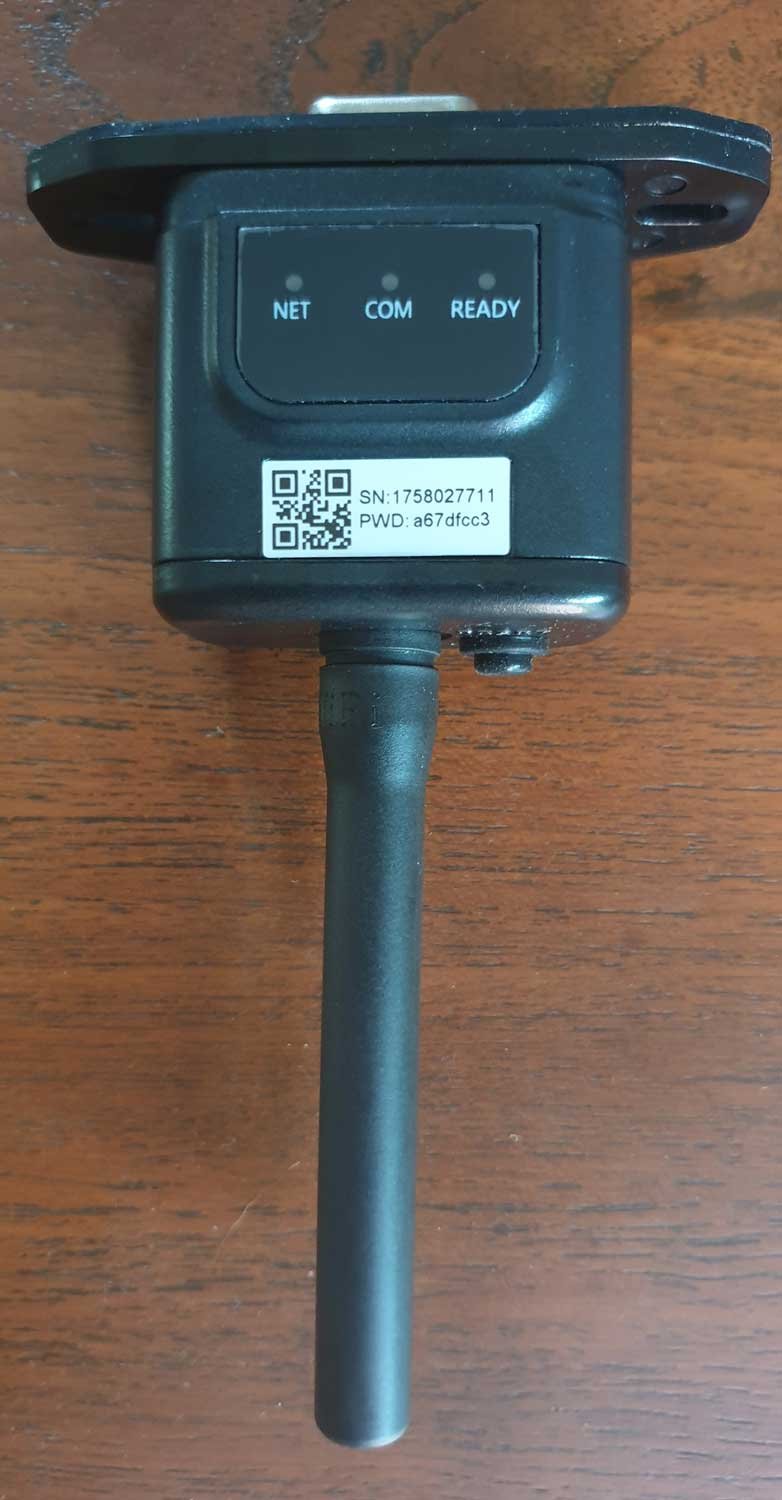
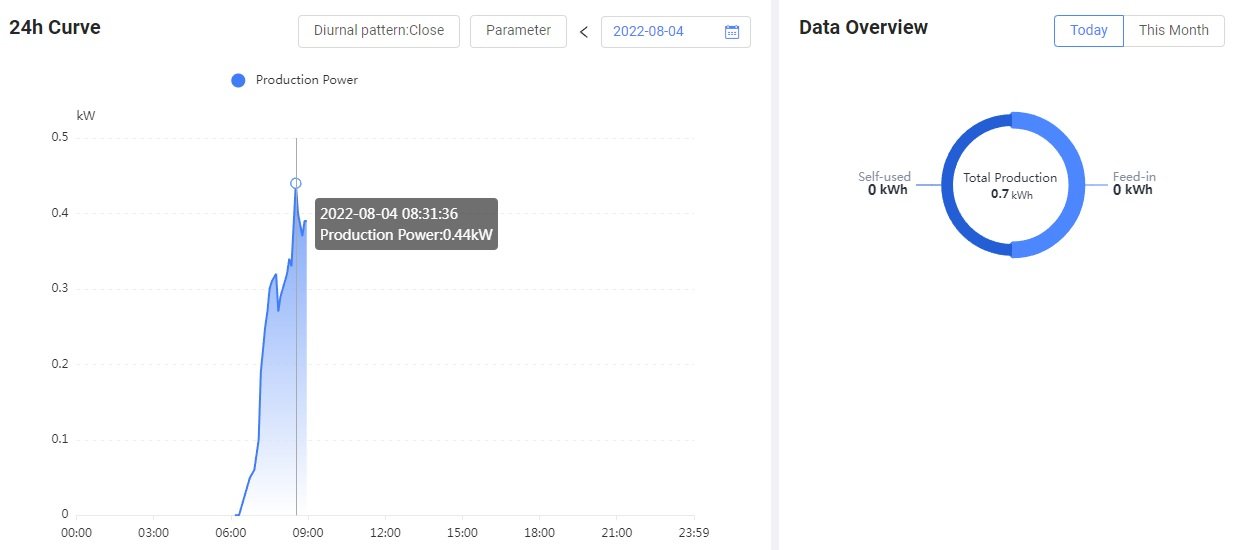
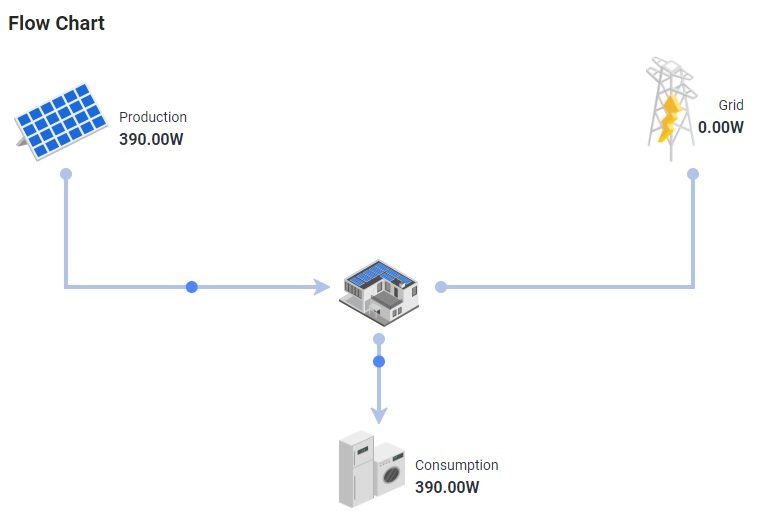
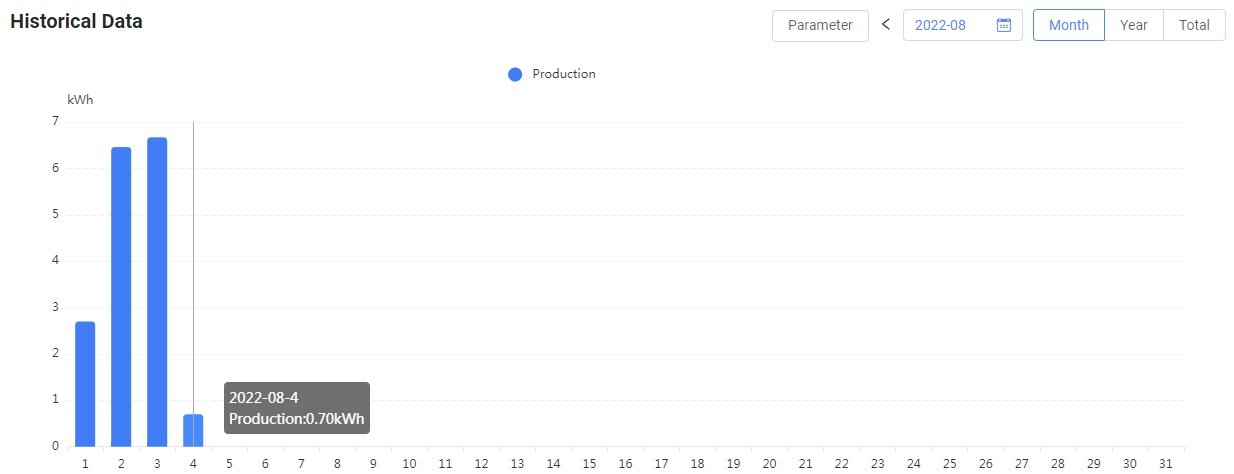
OK, from a nurd’s perspective (me). I think that you’ll find most inverters now come with some form of WiFi facility which enables it to send data to either your own computer or to a remote server via your router. Some inverters use an external plug in WiFi module, whilst others have the WiFi facility built into them. My 2kW Sofar inverter came complete with an external plug in module as shown below. FYI… In some cases, you may need to purchase the module as an optional extra. My inverter also comes with a USB + DRMs + RS485 ports so connecting the inverter to your router or PC via cable is also possible. Setting up the communications between the WiFi module and my PC was really child’s play. The inverter came with a very good instruction manual which was in English. There was also a very helpful video showing how to set up the WiFi module on YouTube. Being the lazy old devil that I am, I used the easy option and loaded an app onto my Pc and mobile which enables me to remotely monitor the inverter from anywhere in the world if I wanted to. Just one point to mention. Using the applications suggested by the inverter manufacturer means that your inverter data is being sent to a server in China. In my case, the remote server interrogates the inverter about every 5 minutes. The feedback provided by the application is fairly comprehensive and self-intuitive. I’ve shown a few screen shots below which I've taken in the past few minutes. 1.. Current Production 2.. Schematic Flow Chart Showing Current Production 3.. Graph Showing This Month's Production FYI.... There's a lot more facilities and information available on the application. It's also possible to download all the data into an Excel spreadsheet so that you can produce your own graphs if required. I hope this helps.